Airlink AGSW1600V2 Quick Installation Guide - Page 8
Rack Installation, 4 Power on the Switch
 |
View all Airlink AGSW1600V2 manuals
Add to My Manuals
Save this manual to your list of manuals |
Page 8 highlights
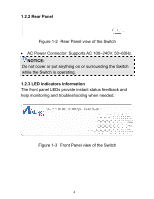
2.3 Rack Installation The Switch is rack-mountable and can be installed on an EIA 11-inch equipment rack. To do this, first install the mounting brackets on the Switch's side panels (one on each side), secure them with the included screws, and then use the screws provided with the equipment rack to mount the Switch. 2.4 Power on the Switch The Switch has a universal power supply ranging from 100V to 240V AC, 50 ~ 60Hz power source. The AC power connector is located at the rear of the unit. The switch's power supply will adjust to the local power source automatically. 7
-
 1
1 -
2
-
 3
3 -
 4
4 -
 5
5 -
 6
6 -
 7
7 -
 8
8 -
 9
9 -
 10
10 -
 11
11 -
 12
12 -
 13
13
 |
 |

7
2.3 Rack Installation
The Switch is rack-mountable and can be installed on an EIA
11-inch equipment rack. To do this, first install the mounting
brackets on the Switch’s side panels (one on each side),
secure them with the included screws, and then use the
screws provided with the equipment rack to mount the
Switch.
2.4 Power on the Switch
The Switch has a universal power supply ranging from 100V
to 240V AC, 50 ~ 60Hz power source. The AC power
connector is located at the rear of the unit. The switch’s
power supply will adjust to the local power source
automatically.