Airlink ASOHOVIA Quick installation guide - Page 6
Installation - ethernet card
 |
View all Airlink ASOHOVIA manuals
Add to My Manuals
Save this manual to your list of manuals |
Page 6 highlights
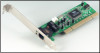
Installation Installation the 10/100Mbps PCI bus Fast Ethernet Card requires Hardware installation first, then BIOS and Software installation. Step 1, Hardware Installation 1. Switch off the computer, unplug the power cord, and remove the computer's cover. 2. Select an unused PCI bus-master slot and remove its protective bracket. 3. Carefully insert the card and press until all the edge connectors are firmly seated inside the slot. Then, screw the card's bracket securely into the PC's chassis. 4. Attach the Wake-On-LAN cable (optional, for PCI 2.1 motherboard). If you require Wake-On-LAN capability, attach one end of the 3-pin Wake-On-LAN cable to the connector on the top edge of the card, and the other end to the "WOL" connector on the computer's motherboard. Refer to your computer's installation manual to locate this connector. 5. Install the bracket screw, which secures the card to the cinouter chassis. 6. Replace the computer's cover and connect the network cable to newly installed network card. Reconnect the computer's power cord and plug it into the power outlet. 6
-
 1
1 -
 2
2 -
 3
3 -
 4
4 -
 5
5 -
 6
6 -
 7
7 -
 8
8 -
 9
9
 |
 |
