Airlink AWLL5055 User Manual - Page 22
Pin Input Config
 |
UPC - 658729081680
View all Airlink AWLL5055 manuals
Add to My Manuals
Save this manual to your list of manuals |
Page 22 highlights
- For Pin Input Config method, click Pin Input Config (PIN) button, continue to Step 4.6.3a Step 4.6.2 When you see this window pops up, within the following 2 minutes, push the Easy Setup Button (i.e. WPS button) on the back of the router and release it right away. The router will now start to synchronize the security settings with the wireless USB adapter. The connection will be built in few seconds. Step 4.6.3a If you choose the Pin Code method, click Yes when prompted with the question "Do you want to select a specific AP?". 21
-
 1
1 -
2
-
3
-
4
-
5
-
6
-
7
-
8
-
9
-
10
-
11
-
12
-
13
-
14
-
15
-
16
-
 17
17 -
 18
18 -
 19
19 -
 20
20 -
 21
21 -
 22
22 -
 23
23 -
 24
24 -
 25
25 -
 26
26 -
 27
27 -
28
-
29
-
30
-
31
-
32
-
33
-
34
-
35
-
36
-
37
-
38
-
39
-
40
-
41
-
42
-
43
-
44
-
45
-
46
-
47
-
48
-
49
 |
 |

21
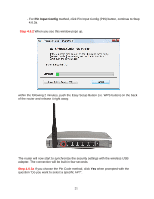
- For
Pin Input Config
method, click Pin Input Config (PIN) button, continue to Step
4.6.3a
Step 4.6.2
When you see this window pops up,
within the following 2 minutes, push the Easy Setup Button (i.e. WPS button) on the back
of the router and release it right away.
The router will now start to synchronize the security settings with the wireless USB
adapter. The connection will be built in few seconds.
Step 4.6.3a
If you choose the Pin Code method, click
Yes
when prompted with the
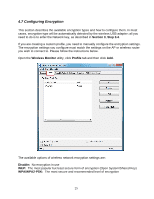
question “Do you want to select a specific AP?”.