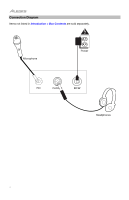
Alesis Melody 61 MKII User Guide - Page 5
Features - keyboard
 |
View all Alesis Melody 61 MKII manuals
Add to My Manuals
Save this manual to your list of manuals |
Page 5 highlights
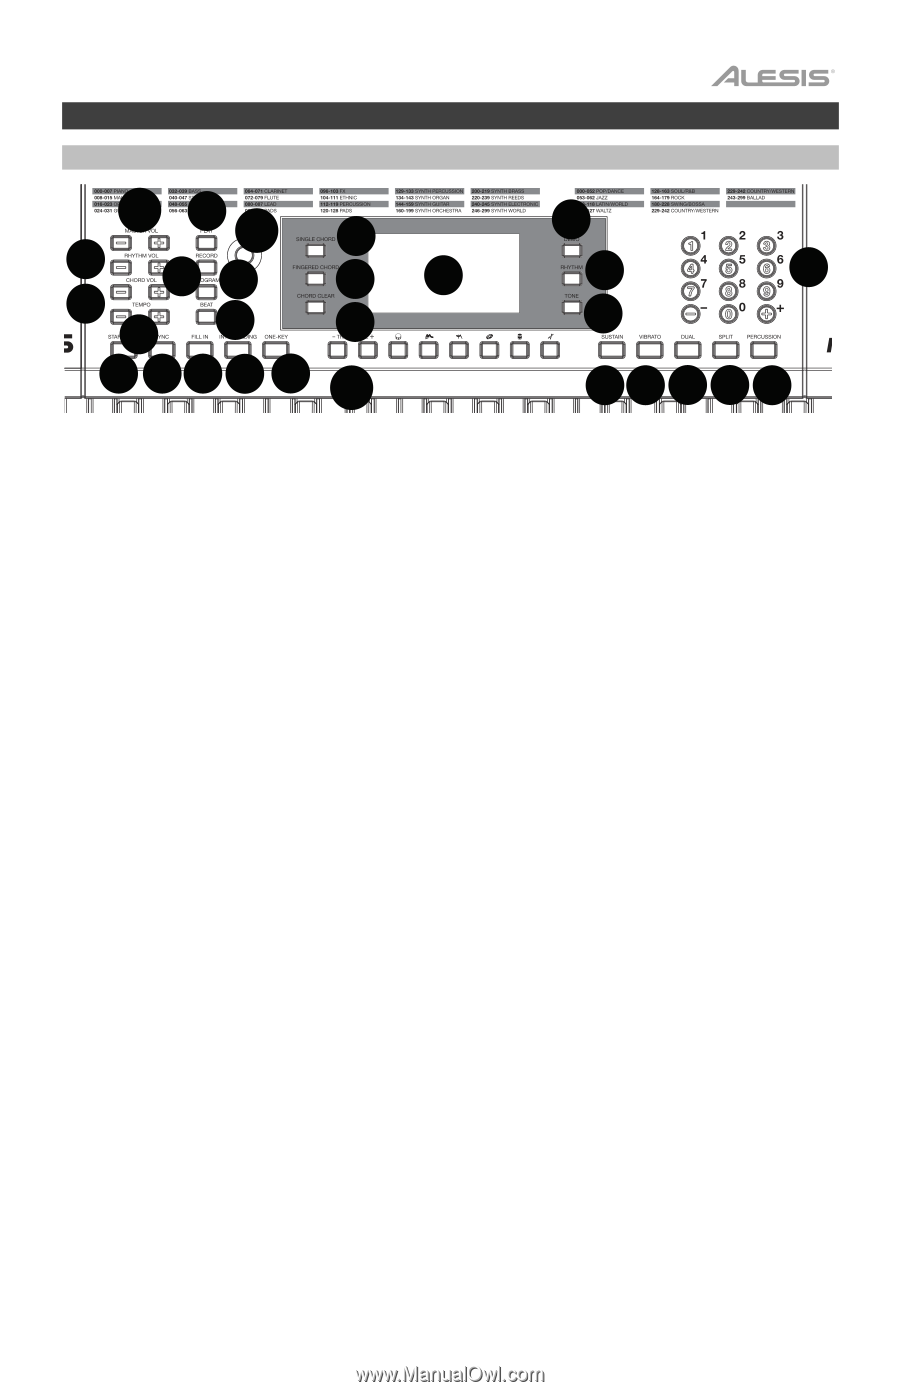
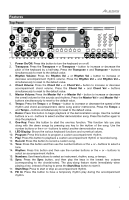
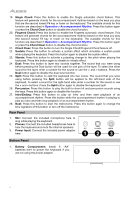
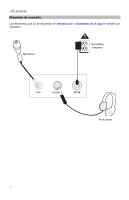
Features Top Panel 5 11 1 3 12 10 4 6 28 19 20 9 21 17 16 18 27 8 2 7 14 15 13 22 23 24 25 26 1. Power On/Off: Press this button to turn the keyboard on or off. 2. Transpose: Press the Transpose + or Transpose - button to increase or decrease the pitch of the keyboard by a half-step. Press the Transpose + and Transpose - buttons simultaneously to reset to the default value. 3. Rhythm Volume: Press the Rhythm Vol + or Rhythm Vol - button to increase or decrease accompaniment rhythm volume. Press the Rhythm Vol + and Rhythm Vol - simultaneously to reset to the default value. 4. Chord Volume: Press the Chord Vol + or Chord Vol - button to increase or decrease accompaniment chord volume. Press the Chord Vol + and Chord Vol - buttons simultaneously to reset to the default value. 5. Master Volume: Press the Master Vol + or Master Vol - button to increase or decrease the overall volume for the sounds and rhythms. Press the Master Vol + and Master Vol - buttons simultaneously to reset to the default value. 6. Tempo: Press the Tempo + or Tempo - button to increase or decrease the speed of the rhythm and chord accompaniment, demo song and/or metronome. Press the Tempo + and Tempo - buttons simultaneously to reset to the default value. 7. Demo: Press this button to begin playback of the demonstration songs. Use the number buttons or + or - buttons to select another demonstration song. Press this button again to stop the playback. 8. One-Key: Press this button to start the one-key function. This function lets you play along with the demo songs by pressing any key to the rhythm of the song. Use the number buttons or the + or - buttons to select another demonstration song. 9. LED Display: Shows the various keyboard functions and numerical values. 10. Program: Press this button to program a custom accompaniment rhythm. 11. Play: Press this button to playback a custom accompaniment rhythm or recorded song. 12. Record: Press this button to record a custom song. 13. Tone: Press this button and then use the number buttons or the + or - buttons to select a tone. 14. Rhythm: Press this button and then use the number buttons or the + or - buttons to select an accompaniment rhythm. 15. Numbers: Use these buttons to select an instrument, rhythm, song, or tempo. 16. Sync: Press the Sync button, and then play the keys in the lowest two octaves (corresponding to the chords/notes). The play-along feature starts immediately when playing a key, instead of having to press the Start/Stop button to start it. 17. Start/Stop: Press to start or stop an accompaniment rhythm. 18. Fill In: Press this button to have a temporary rhythm play during the accompaniment rhythm. 5
-
 1
1 -
 2
2 -
 3
3 -
 4
4 -
 5
5 -
 6
6 -
 7
7 -
 8
8 -
 9
9 -
 10
10 -
 11
11 -
12
-
13
-
14
-
15
-
16
-
17
-
18
-
19
-
20
-
21
-
22
-
23
-
24
-
25
-
26
-
27
-
28
-
29
-
30
-
31
-
32
-
33
-
34
-
35
-
36
 |
 |