Alesis Strike Drum Module Strike Performance Drum Module - Quickstart Guide v1 - Page 5
Transport Buttons - manual
 |
View all Alesis Strike Drum Module manuals
Add to My Manuals
Save this manual to your list of manuals |
Page 5 highlights
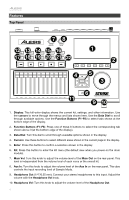
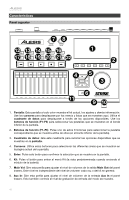
11. Sliders: Use these sliders to adjust the independent volume level of each trigger in your current kit. The trigger's name is shown under the slider. 12. Note Chase: Press this button to activate or deactivate the Note Chase feature. When active, hitting a trigger will automatically select it in the drum module. Alternatively, press Kit to enter the Kit menu, and then use the cursors to select a trigger manually. 13. Mixer: Press this button to enter Mixer Mode. 14. Sample: Press this button to enter Sample Edit Mode. 15. Utility: Press this button to show the Utility menu. 16. Save: Press this button to save the current kit or other settings (depending on the current mode). Please see the user guide to learn about this. 17. Edit > Kit FX: Press this button to enter Kit Effects Mode where you can set the reverb, EQ, compression, and 2 sets of effects for each kit. 18. Edit > Voice: Press this button to enter Voice Mode where you can edit the sounds assigned to each drum or cymbal pad. 19. Edit > Triggers: Press this button to enter Trigger Mode where you can adjust the sensitivity and overall feel of each drum or cymbal pad. The default settings should already be optimal for a wide range of playing styles, but if you need to change them, you can do so here. 20. Metronome > On/Off: Press this button to turn the metronome on or off. 21. Metronome > Tempo: Press this button 3 or more times in succession at the desired rate to change the tempo of the metronome (in BPM). Alternatively, if the tempo is shown in the display, press and hold this button and turn the data dial to change the BPM. The light above this button will flash at the current tempo. 22. Transport Buttons: Use these buttons to control sample playback. These buttons work even when the drum module is not in Sample Mode. • Rewind/Fast-Forward ( / ): Press and hold one of these buttons to "scrub" backward or forward (respectively) through the sample. • Play ( ): Press this button to start sample playback or recording. • Stop (): Press this button to stop sample playback or recording. • Record (): Press this button to show the Sample Record screen. Press it again to begin recording the signal from the Aux In, and then press it once more to stop the recording. You will then be in Sample Edit Mode where you can edit and save your new sample. 5
-
 1
1 -
 2
2 -
 3
3 -
 4
4 -
 5
5 -
 6
6 -
 7
7 -
 8
8 -
 9
9 -
 10
10 -
 11
11 -
12
-
13
-
14
-
15
-
16
-
17
-
18
-
19
-
20
-
21
-
22
-
23
-
24
-
25
-
26
-
27
-
28
-
29
-
30
-
31
-
32
-
33
-
34
-
35
-
36
 |
 |