Alesis TransActive Mobile Quick Start Guide - Page 3
Fully Charge The Battery Before First Use For, Maximum Battery Life - pa system
 |
View all Alesis TransActive Mobile manuals
Add to My Manuals
Save this manual to your list of manuals |
Page 3 highlights
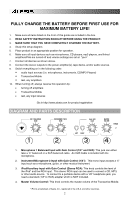
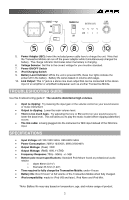
FULLY CHARGE THE BATTERY BEFORE FIRST USE FOR MAXIMUM BATTERY LIFE! 1. Make sure all items listed on the front of this guide are included in the box. 2. READ SAFETY INSTRUCTION BOOKLET BEFORE USING THE PRODUCT. 3. MAKE SURE THAT YOU HAVE COMPLETELY CHARGED THE BATTERY. 4. Study this setup diagram. 5. Place product in an appropriate position for operation. 6. Make sure all input devices such as microphones, CD players, mp3 players, and linked amplifiers/PAs are turned off and volume settings are set at "zero" 7. Connect all devices as shown above. 8. Connect the stereo outputs to the power amplifier(s), tape decks, and/or audio sources. 9. Switch everything on in the following order: ™ audio input sources (i.e. microphones, instruments, CD/MP3 Players) ™ Transactive Mobile ™ last, any amplifiers 10. When turning off, always reverse this operation by: • turning off amplifiers • Transactive Mobile • last, any input devices Go to http://www.alesis.com for product registration. DIAGRAM AND PARTS DESCRIPTION 1. Microphone 1 Balanced Input with Gain Control (1/4" and XLR): This jack can either take a ¼" balanced or a XLR balanced cable. An XLR Cable is included with the microphone. 2. Instrument/Microphone 2 Input with Gain Control (1/4"): This mono input accepts a ¼" input such as a microphone, guitar, or other musical instrument. 3. iPod/Auxuliary input with Gain Control (Stereo RCA): This knob controls the level of the iPod* and the RCA input. This stereo RCA input can be used to connect a CD, MP3, or other audio source. To connect to a portable device with a 1/8" headphone jack, you need a standard (1/8" to RCA) adapter which is NOT included. 4. Master Volume Control: This knob controls the master volume of the Transactive Mobile. * iPod is a trademark of Apple, Inc., registered in the U.S.A. and other countries. 2
-
 1
1 -
 2
2 -
 3
3 -
 4
4
 |
 |