Alesis TransActive Wireless User Guide - Page 4
Diagram And Parts Description - powered speaker
 |
View all Alesis TransActive Wireless manuals
Add to My Manuals
Save this manual to your list of manuals |
Page 4 highlights
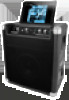
DIAGRAM AND PARTS DESCRIPTION 7 8 1 2 35 34 6 1. Microphone Input with Volume Control (XLR-1/4"): This mono input accepts a XLR-1/4" input such as a microphone or other musical instrument. 2. Instrument/Microphone Input with Volume Control: 1/4" TS input, high- impedance for guitar. 3. Auxiliary Input with volume Control: This stereo 1/8" input can be used to connect a CD player, MP3 player, or other audio source. Volume control adjusts auxiliary input and Bluetooth volume. 4. Bluetooth: The Paired LED will be lit when a device is paired to TransActive Wireless. This LED will not be lit when TransActive Wireless is first powered on (unless it was previously paired with a device). Press the 12 Disconnect button to disconnect a paired Bluetooth device. 11 5. Master Volume Control: This adjusts the speaker's main mix volume, which includes Instrument/Microphone Input, Auxiliary Input, Tuner, and the audio of a paired Bluetooth device. 6. Power LED: Indicates whether TransActive Wireless is on or off. 9 10 7. Device Charge: Connect your device's charge cable here to charge it. USB charging only functions when the unit's power is turned on. Note: Users with iPad (3rd generation) may experience slower charging. We recommend charging with the screen locked when using iPad (3rd generation). 8. Device Cradle: Place your iPad/iPod touch®/iPhone®, Android® or other device here to be held. 9. Power Cable Input (IEC): Insert the included power cable here to charge the unit. Note that the TransActive Wireless can run off the power adapter while it simultaneously charges the battery. The charge indicator illuminates when the battery is charging. *WARNING: If your unit has a voltage selector switch, change its setting only when necessary (e.g., when traveling to a country or region with a different voltage). Selecting an improper voltage setting can damage the unit. To change its setting, only remove *one* screw of the cover and slide it aside to expose the selector. 10. Voltage Selector*: If your unit has a voltage selector switch, change its setting only when necessary (e.g., when traveling to a country or region with a different voltage). Selecting an improper voltage setting can damage the unit. To change its setting, only remove *one* screw of the cover and slide it aside to expose the selector. 11. Power ON/OFF Switch: Turns TransActive Wireless on or off. Please note that while TransActive Wireless is connected to a power source, it does not need to be powered on to charge the battery. 12. Battery Level Indicator: While the unit is powered ON, these four lights indicate the power left in the battery. Battery life varies based on volume and usage. iPhone and iPod touch are trademarks of Apple Inc., registered in the U.S. and other countries. Android is a trademark of Google Inc. 4
-
 1
1 -
 2
2 -
 3
3 -
 4
4 -
 5
5 -
 6
6 -
 7
7 -
 8
8 -
 9
9 -
 10
10 -
11
-
12
-
13
-
14
-
15
-
16
-
17
-
18
-
19
-
20
 |
 |
