Alpine CDE-175BT Owners Manual - Page 10
Detaching the Front Panel, Resetting the Unit, Setting the Clock
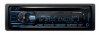 |
View all Alpine CDE-175BT manuals
Add to My Manuals
Save this manual to your list of manuals |
Page 10 highlights
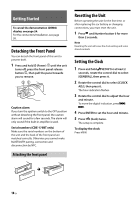
Getting Started To cancel the demonstration (DEMO) display, see page 24. For the connection/installation, see page 38. Detaching the Front Panel You can detach the front panel of this unit to prevent theft. 1 Press and hold (Power) until the unit turns off, press the front panel release button , then pull the panel towards you to remove. Caution alarm If you turn the ignition switch to the OFF position without detaching the front panel, the caution alarm will sound for a few seconds. The alarm will only sound if the built-in amplifier is used. Serial numbers (CDE-175BT only) Make sure the serial numbers on the bottom of the unit and the back of the front panel are matched correctly. Otherwise you cannot make BLUETOOTH pairing, connection and disconnection by NFC. Attaching the front panel Resetting the Unit Before operating the unit for the first time, or after replacing the car battery or changing connections, you must reset the unit. 1 Press and Number button 6 for more than 2 seconds. Note Resetting the unit will erase the clock setting and some stored contents. Setting the Clock 1 Press and hold /SETUP for at least 2 seconds, rotate the control dial to select [GENERAL], then press it. 2 Rotate the control dial to select [CLOCK ADJ], then press it. The hour indication flashes. 3 Rotate the control dial to adjust the hour and minute. To move the digital indication, press / . 4 Press ENTER to set the hour and minute. 5 Press (back) twice. The setup is complete. To display the clock Press VIEW. 10-EN
-
 1
1 -
2
-
3
-
4
-
 5
5 -
 6
6 -
 7
7 -
 8
8 -
 9
9 -
 10
10 -
 11
11 -
 12
12 -
 13
13 -
 14
14 -
 15
15 -
16
-
17
-
18
-
19
-
20
-
21
-
22
-
23
-
24
-
25
-
26
-
27
-
28
-
29
-
30
-
31
-
32
-
33
-
34
-
35
-
36
-
37
-
38
-
39
-
40
-
41
-
42
-
43
-
44
-
45
-
46
-
47
-
48
-
49
-
50
-
51
-
52
-
53
-
54
-
55
-
56
-
57
-
58
-
59
-
60
-
61
-
62
-
63
-
64
-
65
-
66
-
67
-
68
-
69
-
70
-
71
-
72
-
73
-
74
-
75
-
76
-
77
-
78
-
79
-
80
-
81
-
82
-
83
-
84
-
85
-
86
-
87
-
88
-
89
-
90
-
91
-
92
-
93
-
94
-
95
-
96
-
97
-
98
-
99
-
100
-
101
-
102
-
103
-
104
-
105
-
106
-
107
-
108
-
109
-
110
-
111
-
112
-
113
-
114
-
115
-
116
-
117
-
118
-
119
-
120
-
121
-
122
-
123
-
124
-
125
-
126
-
127
-
128
-
129
-
130
-
131
-
132
-
133
-
134
-
135
-
136
-
137
-
138
-
139
-
140
-
141
-
142
-
143
-
144
-
145
-
146
-
147
-
148
 |
 |
