Alpine CDE 9873 Owners Manual - Page 17
Setup
 |
UPC - 793276711335
View all Alpine CDE 9873 manuals
Add to My Manuals
Save this manual to your list of manuals |
Page 17 highlights
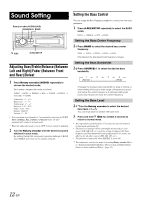
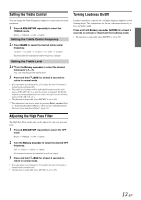
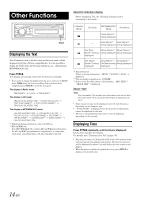
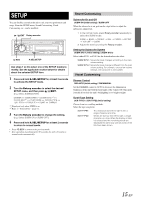
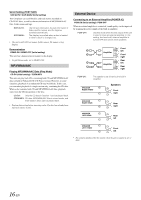
SETUP You can flexibly customize the unit to suit your own preferences and usage. From the SETUP menu, Sound Customizing, Visual Customizing, etc., can be modified. / /ENT Rotary encoder /RTN A.SEL/SETUP Use steps 1 to 4 to select one of the SETUP modes to modify. See the applicable section below for details about the selected SETUP item. 1 Press and hold A.SEL/SETUP for at least 2 seconds to activate the SETUP mode. 2 Turn the Rotary encoder to select the desired SETUP menu, and then press / /ENT. (e.g. Select SUBWOOFER) DIMMER SUBWOOFER (SUBW SYS) *1 CLOCK ADJ*2 PLAY MODE SCROLLTYPE TEXT SCR POWER IC DEMO DIMMER *1 Displayed only when SUBW is on. *2 Refer to "Setting Time" (page 7). 3 Turn the Rotary encoder to change the setting. (e.g. Select SUBW ON or SUBW OFF.) 4 Press and hold A.SEL/SETUP for at least 2 seconds to return to normal mode. • Press /RTN to return to the previous mode. • If no operation is performed for 60 seconds, the unit will return to normal mode automatically. Sound Customizing Subwoofer On and Off SUBW ON (Initial setting) / SUBW OFF When the subwoofer is on, perform the steps below to adjust the subwoofer output level. 1 In the normal mode, press Rotary encoder repeatedly to select the SUBW mode. SUBW BASS TREBLE BAL FADER DEFEAT VOLUME SUBW 2 Adjust the level by turning the Rotary encoder. Setting the Subwoofer System SUBW SYS 1 (Initial setting) / SUBW SYS 2 Select either SYS 1 or SYS 2 for the desired subwoofer effect. SUBW SYS 1: Subwoofer level changes according to the main volume setting. SUBW SYS 2: Subwoofer level change is different from the main volume setting. For example, even at low volume settings, the subwoofer is still audible. Visual Customizing Dimmer Control DIM AUTO (Initial setting) / DIM MANUAL Set the DIMMER control to AUTO to decrease the illumination brightness of the unit with the head lights of the vehicle ON. This mode is useful if you feel the unit's backlighting is too bright at night. Scroll Type Setting SCR TYPE1 / SCR TYPE2 (Initial setting) Choose from two scrolling methods. Select the type you prefer. SCR TYPE1: SCR TYPE2: The characters scroll from right to left, a single character at a time. Words are built up from left to right, a single character at a time. When the display is filled, it is cleared and the remaining words are displayed the same way until all words of the title have been shown. 15-EN
-
 1
1 -
2
-
3
-
4
-
5
-
6
-
7
-
8
-
9
-
10
-
11
-
 12
12 -
 13
13 -
 14
14 -
 15
15 -
 16
16 -
 17
17 -
 18
18 -
 19
19 -
 20
20 -
 21
21 -
 22
22 -
23
-
24
-
25
-
26
-
27
-
28
-
29
-
30
-
31
-
32
-
33
-
34
-
35
-
36
-
37
-
38
-
39
-
40
-
41
-
42
-
43
-
44
-
45
-
46
-
47
-
48
-
49
-
50
-
51
-
52
-
53
-
54
-
55
-
56
-
57
-
58
-
59
-
60
-
61
-
62
-
63
-
64
-
65
-
66
-
67
-
68
-
69
-
70
-
71
-
72
-
73
-
74
-
75
-
76
-
77
-
78
-
79
-
80
-
81
-
82
-
83
-
84
-
85
-
86
-
87
-
88
 |
 |