Alpine R2-DB8V-TRK Owners Manual - Page 3
shown. Additional feet spacers are included
 |
View all Alpine R2-DB8V-TRK manuals
Add to My Manuals
Save this manual to your list of manuals |
Page 3 highlights
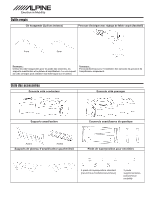
1 Installation screws are temporarily installed in both driver and passenger side enclosures. Remove all screws to prepare for assembly. Stacking feet screws Stacking feet screws Rear bracket screws Driver side Passenger side 2 If applicable, attach inner amp tray brackets using supplied M5x20mm screws (4pcs.) and M5x20mm washers (4pcs.). Note: Amp tray brackets can be trimmed for narrow applications. Amp tray will not be used in some applications - See fitment chart. If Amp brackets are not installed, the 4 mount screws should be left snugly tightened in both enclosures. Caution: To avoid damage to the enclosure use supplied Hex Key driver for when installing the amp brackets. Front bracket screws Front bracket screws Amp bracket screws 3 Place enclosures upside down on a flat surface and set to required width. Align rear link bracket with threaded inserts and secure bracket using supplied M5x20mm screws (4pcs.) and M5x12mm washers (4pcs.). Caution: To avoid damage to the enclosure use supplied Hex Key driver for when installing the rear bracket. Amp tray brackets 4 Rotate assembly rightside up and attach front link bracket using supplied M5x20mm screws (4pcs.) and M5x20mm washers (4pcs.) as shown. Caution: To avoid damage to the enclosure use supplied Hex Key driver for when installing the front bracket. See Table 1 Rear bracket 5 Using the supplied M5x60mm screws (6pcs.) and M5x20mm washers (6pcs.) install feet as shown. Additional feet spacers are included to accomodate vehicles with uneven floors, floor mats etc. - see fitment chart. Front bracket 6 Place mono amplifier on amp tray and mark the mount holes. Then drill and mount with appropriate size screws (not included). Caution: To avoid damage to the enclosure use supplied Hex Key driver for when installing the enclosure feet.
-
 1
1 -
 2
2 -
 3
3 -
 4
4 -
 5
5 -
 6
6 -
 7
7 -
 8
8
 |
 |
