Alpine RUE-4190 Owners Manual - Page 2
Map type Navigation Control Mode, Head Unit Control Mode, TV/Monitor Control Mode, AV Head Unit - manual
 |
View all Alpine RUE-4190 manuals
Add to My Manuals
Save this manual to your list of manuals |
Page 2 highlights
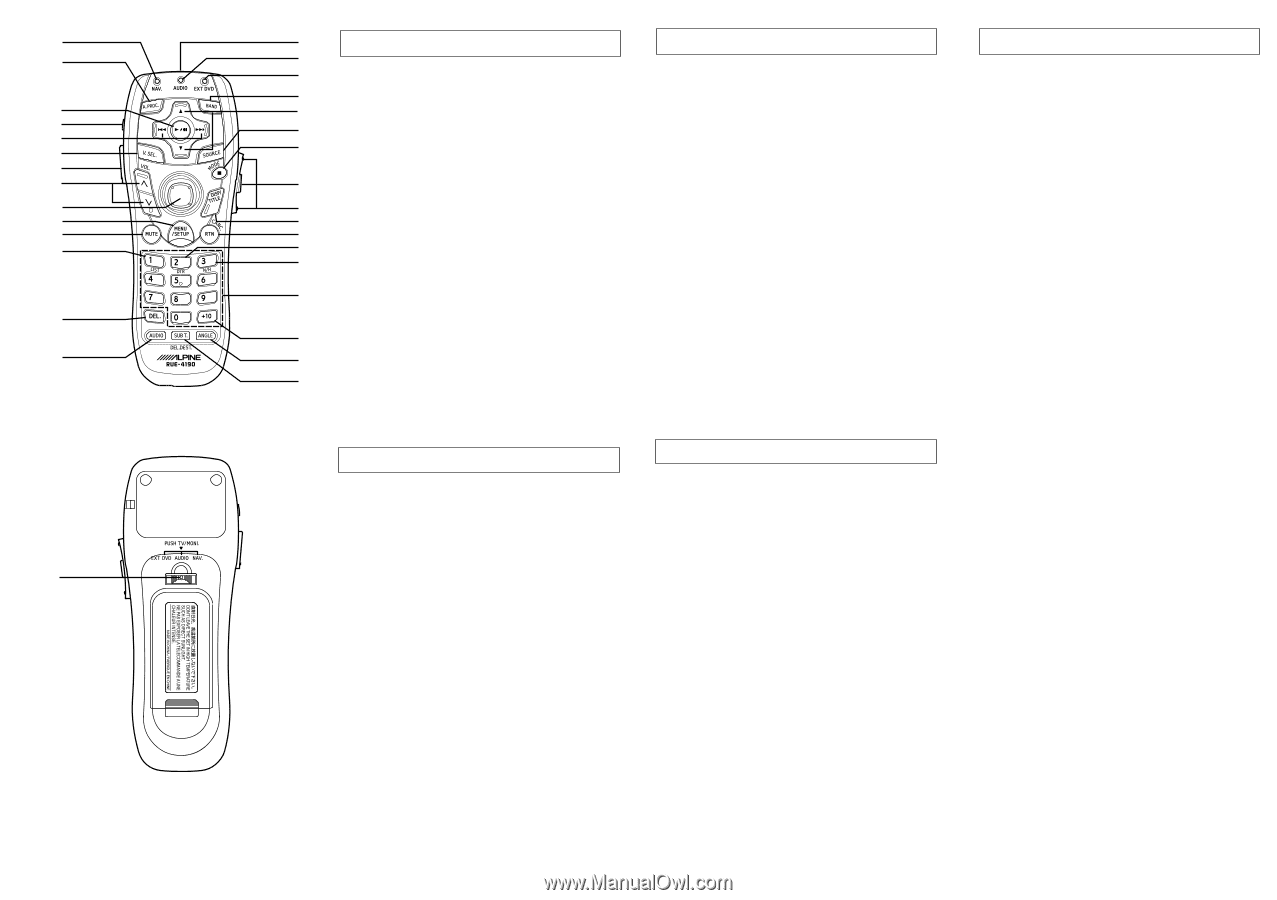
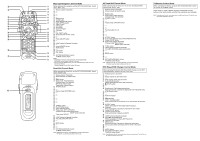
Map type Navigation Control Mode AV Head Unit Control Mode TV/Monitor Control Mode ~ 1 When operating the navigation, set the EXT DVD/AUDIO/NAV. Switch to the "NAV." side. When operating the AV Head Unit, set the EXT DVD/AUDIO/NAV. Switch to the "AUDIO" side. When controlling the Monitor, press the EXT DVD/AUDIO/NAV. Switch to activate the TV/MONI. mode. + 2 1 Remote Control Transmitter 3 2- 3- 1 Remote Control Transmitter 2 Status indicator for AUDIO mode 3- Check which TV Tuner or Monitor functions corresponds to which buttons on the remote control and attach the appropriate seal (supplied). , . / 4 4- 5- 5 6- 7 MODE button 6 8 VOICE button 9 Zoom (Wide/Detail) button 7 ! DISP (MP/RG) button " CANC. button 4 BAND button 5 Radio mode: Preset Selection Changer mode: Disc Selection 6 SOURCE button 7- 8- 9 Display Angle UP/DOWN button !- Note: Depending on the unit, some operations cannot be performed. For details, see the Owner's Manual for the unit. : # DTR button $ N/H button "- #- ; 8 % Numeric Keypad & OK button $- % Function button (1 to 7) < 9 (- ) DEL. DEST. button &- (- = > ? ! ~ Status indicator for NAV. mode " # +- ,- - Power ON/OFF button $ .- /- )- ~- + A.PROC. button , Audio mode Selection (VOL./BASS/TRE/BAL/FAD) - Power ON/OFF button . Radio mode: SEEK UP/DOWN : LIGHT button for Remote Controller Changer mode: Music Sensor ;- BW/FF (press and hold) % < Joystick/ENTER button / V.SEL. button = MENU button : LIGHT button for Remote Controller @ >- ? LIST button ; VOLUME UP/DOWN, Audio Adjust button MUTE button [ ( \ EXT DVD/AUDIO/NAV. Switch TV/MONI. button (Push) ?- @- Notes: ) • Depending on the unit, some operations cannot be performed. [- \ EXT DVD/AUDIO/NAV. Switch For details, see the Owner's Manual for the unit. TV/MONI. button (Push) • After pressing the MODE button, press the following buttons while the status indicator is blinking: Numeric Keypad (0 to 9), DEL. button, OK button Note: Depending on the unit, some operations cannot be performed. For details, see the Owner's Manual for the unit. Head Unit Control Mode DVD Player/DVD Changer Control Mode When operating the External DVD Player/DVD Changer, set the EXT When operating the Head Unit, set the EXT DVD/AUDIO/NAV. Switch DVD/AUDIO/NAV. Switch to the "EXT DVD" side. to the "AUDIO" side. 1 Remote Control Transmitter 1 Remote Control Transmitter 2- 2 Status indicator for AUDIO mode 3 Status indicator for EXT DVD mode 3- 4- 4 BAND button 5 DVD Changer mode: Disc Selection 5 Radio mode: Preset Selection 6 Audio SOURCE button Changer mode: Disc Selection (When connected with the Ai-NET Head Unit) MP3 mode: Folder Select 7 L (STOP) button Tape mode: Program Sensor 8- 6 SOURCE button 9- 7- ! Searching by Title/Chapter/elapsed time, \ 8- 9 Display Angle UP/DOWN button Press and hold for 2 seconds to display the DVD menu/Title menu " RTN (Return) button !- #- "- $- #- % Numeric Keypad $- &- %- ( ANGLE button &- ) SUB T. (Subtitle) button (- Press and hold this for 2 seconds to turn the subtitles ON and OFF )- ~- ~- + A.PROC. button + A.PROC. button (When connected with the Digital Audio Processor) , PLAY/PAUSE button , Playback - Power ON/OFF button Press and hold for 2 seconds to playback the slow motion . Radio mode: SEEK UP/DOWN - Power ON/OFF button CD/MD/Changer mode: Music Sensor . Chapters and tracks skip BW/FF (press and hold) Press and hold for 2 seconds to BW/FF Tape mode: REW/FF /- /- : LIGHT button for Remote Controller : LIGHT button for Remote Controller ; VOLUME UP/DOWN button ; VOLUME UP/DOWN button (When connected with the Ai-NET Head Unit) MUTE button Press and hold for 2 seconds to display the setup menu ?- > MUTE button (When connected with the Ai-NET Head Unit) @- ?- [- @- \ EXT DVD/AUDIO/NAV. Switch [ AUDIO button TV/MONI. button (Push) \ EXT DVD/AUDIO/NAV. Switch Note: Depending on the unit, some operations cannot be performed. TV/MONI. button (Push) For details, see the Owner's Manual for the unit. Note: Depending on the unit, some operations cannot be performed. For details, see the Owner's Manual for the unit.
-
 1
1 -
 2
2
 |
 |