Alpine S-A60M Owners Manual - Page 20
About Connecting to the Speaker Input Level System, e.g. S-A32F, Important Tips on Bridging an - mono amplifier
 |
View all Alpine S-A60M manuals
Add to My Manuals
Save this manual to your list of manuals |
Page 20 highlights
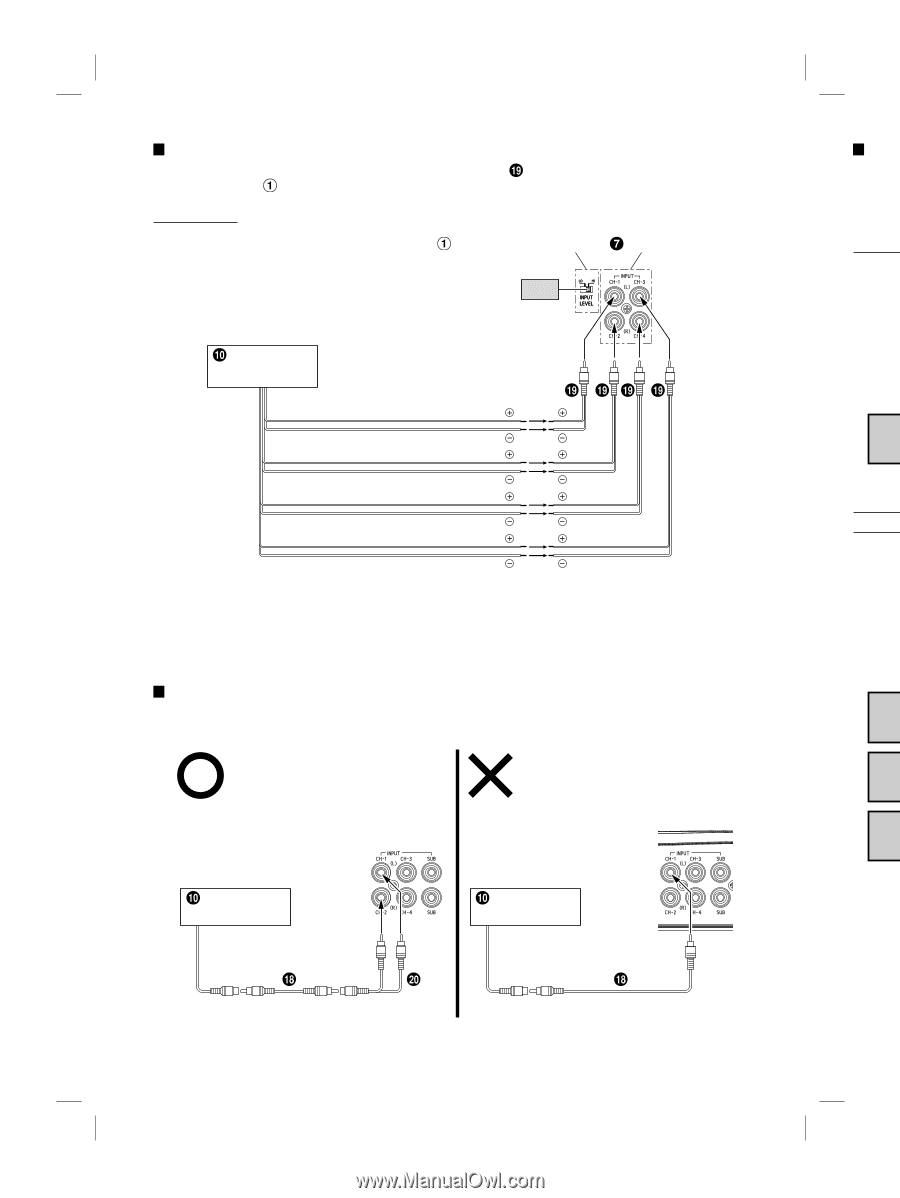
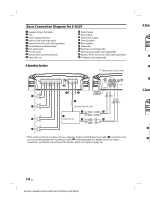
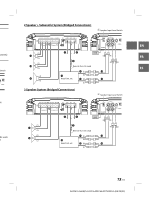
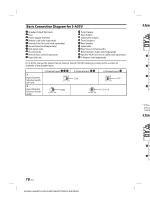
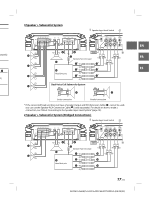
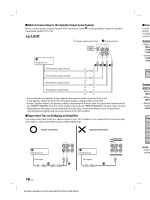
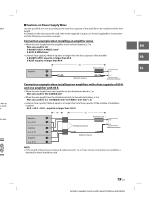
About Connecting to the Speaker Input Level System When connecting by using the Speaker-RCA Conversion Cable ( ) (sold separately), switch the Speaker Input Level Switch ( ) to "HI". e.g. S-A32F Speaker Input Level Switch RCA Input Jacks [HI] Head Unit, etc. Front Speaker output lead (L) Front Speaker output lead (R) Rear Speaker output lead (R) Rear Speaker output lead (L) • Do not mistake the Speaker Output Lead on the head unit side connected to this unit. Front Speaker output (L)/(R) to CH1/CH2, Rear Speaker output (L)/(R) to CH3/CH4 • For the "Speaker Input Level System" setting, connecting the Remote Turn-On Lead is not required due to the "REMOTE SENSING" function of this product. However, the "REMOTE SENSING" function may not work depending on the signal source connected. In such a case, connect the Remote Turn-On Lead to an incoming power supply cord (accessory power) in the ACC position. Important Tips on Bridging an Amplifier Low output will result if only one channel input is used. The Y-adapter is not required if a stereo/mono pair line output is used to drive both inputs of the bridged amp. Proper connection Improper connection Head Unit, etc. One signal Head Unit, etc. One signal Caut Use the s length. For detai and the f Conne • When t Wire s S-A60 S-A32 • Externa S-A60 S-A32 Ampl Conne and on • When t Wire s • When t Wire s • Externa installe 60 A + Ampl (e.g. 6 Ampl (e.g. 6 Ampl (e.g. 4 NOTE: • If the le distribu 18-EN ALPINE S-A60M/S-A32F/S-A55V 68-35792Z59-A (EN/FR/ES)
-
 1
1 -
2
-
3
-
4
-
5
-
6
-
7
-
8
-
9
-
10
-
11
-
12
-
13
-
14
-
 15
15 -
 16
16 -
 17
17 -
 18
18 -
 19
19 -
 20
20 -
 21
21 -
 22
22 -
 23
23 -
 24
24 -
 25
25 -
26
-
27
-
28
-
29
-
30
-
31
-
32
-
33
-
34
-
35
-
36
-
37
-
38
-
39
-
40
-
41
-
42
-
43
-
44
-
45
-
46
-
47
-
48
-
49
-
50
-
51
-
52
-
53
-
54
-
55
-
56
-
57
-
58
-
59
-
60
-
61
-
62
-
63
-
64
-
65
-
66
-
67
-
68
 |
 |