Alpine X009-FD1 Owner's Manual (english) - Page 45
Screen/LED Customize, Setting the Brightness of the Backlighting, Adjusting the Minimum Level
 |
View all Alpine X009-FD1 manuals
Add to My Manuals
Save this manual to your list of manuals |
Page 45 highlights
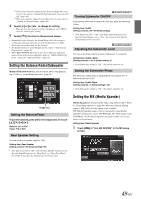
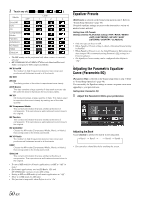
Screen/LED Customize Touch [Screen/LED Customize] on the General setup menu in step 3. Refer to "General Setup Operation" (page 43). Setting the Brightness of the Backlighting Backlighting is provided by a fluorescent light built into the liquid crystal panel. The illumination control adjusts the brightness of the backlighting based on the car ambient lighting for easier viewing. Setting item: Dimmer Setting contents: Auto (Initial setting) / On / Off Auto: On: Off: Adjust the brightness of the background illumination of the monitor automatically to the brightness of the car interior. Keep the background illumination of the monitor dark. Deactivate Auto Dimmer mode to keep the background illumination of the monitor bright. • When "Auto" or "On" is set, the setting is also applied for the button lighting in "Adjusting the Dimmer of Button Lighting at Night" (page 45), and "Adjusting the Minimum Level of Backlight" (page 45). Adjusting the Minimum Level of Backlight You can adjust the brightness of the backlight. This function could be used, for instance, to change the screen brightness while traveling at night. Setting item: Screen Dimmer Level Setting content: -15 to +15 (Initial setting: 0) You can adjust the level between MIN (-15) and MAX (+15). When it reaches the minimum or maximum point, the display shows "MIN" or "MAX" respectively. Adjusting the Dimmer of Button Lighting at Night You can adjust the brightness of the button lighting at night with the dimmer. Setting item: Key Illumination Level Setting level: -2 to +2 (Initial setting: 0) Adjusting the Touch Panel Adjustment becomes necessary when the display position on the LCD and the touch position on the touch panel do not match. Setting item: Screen Alignment 1 Touch [Screen Alignment] in the Screen/LED Customize screen. The adjustment screen appears. 2 Accurately touch the mark provided in the upper left corner of the screen. 3 Accurately touch the mark provided in the lower right corner of the screen. This completes adjustment, and returns to the previous screen. • If you touch [Cancel] on the adjustment screen, no adjustment is done and returns to the previous screen. Initializing the Touch Panel Corrected Values Initialize the corrected values adjusted by Adjusting the Touch Panel. 1 Touch [Screen Alignment Reset] in the Screen/ LED Customize screen. 2 After the confirmation message appears, touch [OK]. The corrected values are initialized. Visual Setting [Visual] is selected on the General setup menu in step 3. Refer to "General Setup Operation" (page 43). 1 Touch the desired item. Switching the Display Color You can choose from 5 different display colors. Setting item: Screen Color Setting contents: Blue / Red / GM GREEN (Initial setting) / Amber / Black • "Video" can be selected while a video is playing. 45-EN
-
 1
1 -
2
-
3
-
4
-
5
-
6
-
7
-
8
-
9
-
10
-
11
-
12
-
13
-
14
-
15
-
16
-
17
-
18
-
19
-
20
-
21
-
22
-
23
-
24
-
25
-
26
-
27
-
28
-
29
-
30
-
31
-
32
-
33
-
34
-
35
-
36
-
37
-
38
-
39
-
 40
40 -
 41
41 -
 42
42 -
 43
43 -
 44
44 -
 45
45 -
 46
46 -
 47
47 -
 48
48 -
 49
49 -
 50
50 -
51
-
52
-
53
-
54
-
55
-
56
-
57
-
58
-
59
-
60
-
61
-
62
-
63
-
64
-
65
-
66
-
67
-
68
-
69
-
70
-
71
-
72
-
73
-
74
-
75
-
76
-
77
-
78
-
79
-
80
-
81
-
82
-
83
-
84
-
85
-
86
-
87
-
88
-
89
-
90
-
91
-
92
-
93
-
94
-
95
-
96
-
97
-
98
-
99
-
100
-
101
-
102
-
103
-
104
-
105
-
106
-
107
-
108
-
109
-
110
-
111
-
112
-
113
-
114
-
115
-
116
-
117
-
118
-
119
-
120
-
121
 |
 |
