Alpine X009-FD2 Installation Manual - Page 10
Full Size Truck
 |
View all Alpine X009-FD2 manuals
Add to My Manuals
Save this manual to your list of manuals |
Page 10 highlights
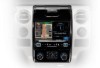
Installation Instructions 1 Attach the brackets using the provided screws. FULL SIZE TRUCK Ford F-150 ˜ 10/12 4 Connect the key harness, 4 pin HVAC-Maestro cable and 3 pin HVAC connector to X009-FD2 radio bezel. Key Unit (Connect to Key Harness X009) HVAC Control Unit 2 Replace the OEM Sync media plate with the new media plate and run the extension cable to the radio cavity. 4 pin HVAC-Maestro cable (Red) (Connect to Maestro Module) 3 pin HVAC Cable (White) (Connect to Vehicle) 5 Mount X009-FD2 radio bezel using 4 x 7mm factory screws. 3 Run the Key harness, 4 pin HVAC-Maestro cable and 3 pin HVAC connector under the head unit and mount it using 4 x 7mm factory screws.
-
 1
1 -
2
-
3
-
4
-
 5
5 -
 6
6 -
 7
7 -
 8
8 -
 9
9 -
 10
10 -
 11
11 -
 12
12
 |
 |

Ford F-150
FULL SIZE TRUCK
±
10/12
Installation Instructions
1
Attach the brackets using the provided screws.
2
Replace the OEM Sync media plate with the new
media plate and run the extension cable to the radio
cavity.
3
Run the Key harness, 4 pin HVAC-Maestro cable
and 3 pin HVAC connector under the head unit and
mount it using 4 x 7mm factory screws.
4
Connect the key harness, 4 pin HVAC-Maestro
cable and 3 pin HVAC connector to X009-FD2 radio
bezel.
5
Mount X009-FD2 radio bezel using 4 x 7mm factory
screws.
4 pin HVAC-Maestro
cable (Red) (Connect to
Maestro Module)
3 pin HVAC Cable
(White) (Connect to
Vehicle)
HVAC
Control
Unit
Key Harness
Key Unit
(Connect to
X009)