Alpine X009-U Owner's Manual (english) - Page 47
Adjusting Image Contrast, Adjusting Picture Quality, Saving and calling the adjusted picture quality
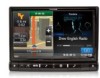 |
View all Alpine X009-U manuals
Add to My Manuals
Save this manual to your list of manuals |
Page 47 highlights
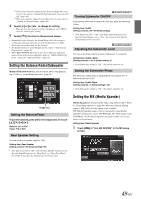
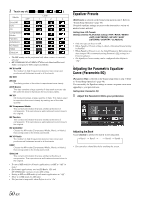
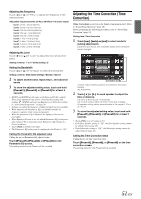
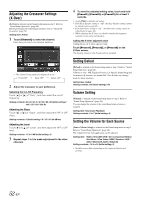
Adjusting Image Contrast Setting item: Contrast Setting content: -15 to +15 (Initial setting: 0) You can adjust the contrast between LOW (-15) and HIGH (+15). When it reaches the minimum or maximum point, the display shows "LOW" or "HIGH" respectively. Adjusting Picture Quality Setting item: Sharp Setting content: -5 to +5 (Initial setting: 0) Picture quality adjustment range is -5 to +5. "SOFT" and "HARD" appear as the minimum and maximum values specified. Saving and calling the adjusted picture quality When adjusting audio (video media), you can store the settings made for "Adjusting Live Contrast, Brightness, Color, Tint, Contrast and Sharp". Setting item: Preset1 / Preset2 1 After completing "Adjusting Live Contrast, Brightness, Color, Tint, Contrast and Sharp" (page 46), touch and hold [Preset1] or [Preset2] to save the settings. 2 Touch [Preset1] or [Preset2] to call the saved settings. • Display Mode cannot be registered. About X009 Touch [About] on the General setup menu in step 3. Refer to "General Setup Operation" (page 43). Displaying the Product Information You can view the version information of this product. Make note of this information and refer to it whenever you contact Alpine Tech Support or an Alpine-authorized dealer. Setting item: Version Information Contents: Serial No. / Firmware Version Checking the DivX® Registration This unit will display the registration code required to play a DivX® VOD (Video On Demand), or you can also display the deregistration code. Setting item: Warranty / Copyright Information Displaying the Registration Code 1 Touch [Warranty/Copyright Information]. 2 Touch [DivX(R) VOD]. 3 Touch [Registration]. The registration code is displayed on the screen. 4 Touch [OK]. Displaying the Deregistration Code 1 Touch [Warranty/Copyright Information]. 2 Touch [DivX(R) VOD]. 3 Touch [Deregistration]. The confirmation dialog screen appears. 4 Touch [OK]. The deregistration code is displayed on the screen. • When you have finished, touch [Cancel]. If you want to continue and display a new registration code, touch [OK], check the registration code, and then touch [OK] again. Initializing the System You can initialize all data, to restore the factory settings. Remove the CD/DVD disc, etc. from the system before operation Setting item: Restore Factory Setting 1 Touch [Restore Factory Setting]. 2 After the confirmation message appears, touch [OK]. The confirmation screen appears again. 3 Touch [OK]. The system starts initialization. • Do not turn on/off the power, change the ignition key position or remove the screen panel until system restart is completed. 47-EN
-
 1
1 -
2
-
3
-
4
-
5
-
6
-
7
-
8
-
9
-
10
-
11
-
12
-
13
-
14
-
15
-
16
-
17
-
18
-
19
-
20
-
21
-
22
-
23
-
24
-
25
-
26
-
27
-
28
-
29
-
30
-
31
-
32
-
33
-
34
-
35
-
36
-
37
-
38
-
39
-
40
-
41
-
 42
42 -
 43
43 -
 44
44 -
 45
45 -
 46
46 -
 47
47 -
 48
48 -
 49
49 -
 50
50 -
 51
51 -
 52
52 -
53
-
54
-
55
-
56
-
57
-
58
-
59
-
60
-
61
-
62
-
63
-
64
-
65
-
66
-
67
-
68
-
69
-
70
-
71
-
72
-
73
-
74
-
75
-
76
-
77
-
78
-
79
-
80
-
81
-
82
-
83
-
84
-
85
-
86
-
87
-
88
-
89
-
90
-
91
-
92
-
93
-
94
-
95
-
96
-
97
-
98
-
99
-
100
-
101
-
102
-
103
-
104
-
105
-
106
-
107
-
108
-
109
-
110
-
111
-
112
-
113
-
114
-
115
-
116
-
117
-
118
-
119
-
120
-
121
 |
 |
