Amana ASI2575GRS Installation Instructions - Page 10
Water Filtration System
 |
View all Amana ASI2575GRS manuals
Add to My Manuals
Save this manual to your list of manuals |
Page 10 highlights
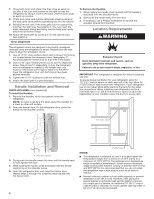
Water Filtration System Do not use with water that is microbiologically unsafe or of unknown quality without adequate disinfection before or after the system. Systems certified for cyst reduction may be used on disinfected waters that may contain filterable cysts. Style 2 1. Locate the water filter cover door in the base grille, and pull open the filter door. Water Filter Status Light (on some models) The filter status light will help you know when to change your water filter. This is located in the refrigerator control panel. ■■ The light will turn red. This tells you that it is time to change the filter. ■■ It is recommended that you replace the filter when the status light turns red or water flow to your water dispenser or ice maker decreases noticeably. NOTE: The filter should be replaced at least every 6 months depending on your water quality and usage. Resetting the Filter Status ■■ The rest button is located on the control panel in the refrigerator compartment. To reset the status light after changing the filter, press TEMP SETTING within 3 seconds. The status light will change from red to off when the system is reset. Changing the Water Filter Style 1 A A. Water filter cover door 2. Twist the water filter and turn 90° counterclockwise to unlock. 3. Pull the filter out of the housing. 4. Remove the water filter cap from the water filter. A A. Water filter cover door 1. Locate the water filter cover door in the base grille, and pull open the filter door. The filter will be released and then be ejected as the door is opened. 2. When the door is completely open, pull the filter straight out. 5. Install the water filter cap onto the new filter. Be sure to align the arrows so the grooves in the filter align with ribs in the filter cap. NOTE: There may be some water in the filter. Some spilling may occur. Use a towel to wipe up any spills. 3. Take the new filter out of its packaging and remove the covers from the O-rings. Be sure the O-rings are still in place after the covers are removed. 4. With the arrow pointing to the left (toward the filter cover door's hinge), align the new filter with the filter housing and slide into place. The filter cover door will automatically begin to close as the new filter is inserted. 5. Close the filter cover door completely in order to snap the filter into place. You may need to press hard. 6. Flush the system. See the "Water and Ice Dispensers" section. 10 6. Insert the filter into the housing.
-
 1
1 -
2
-
3
-
4
-
 5
5 -
 6
6 -
 7
7 -
 8
8 -
 9
9 -
 10
10 -
 11
11 -
 12
12 -
 13
13 -
 14
14 -
 15
15 -
16
-
17
-
18
-
19
-
20
-
21
-
22
-
23
-
24
-
25
-
26
-
27
-
28
-
29
-
30
-
31
-
32
-
33
-
34
-
35
-
36
 |
 |
