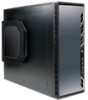
Antec P193 V3 Manual - Page 13
Big Boy 200™ Specifications
 |
View all Antec P193 V3 manuals
Add to My Manuals
Save this manual to your list of manuals |
Page 13 highlights
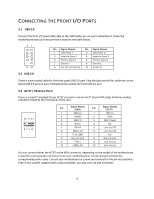
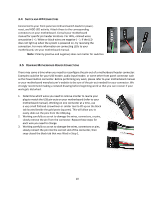
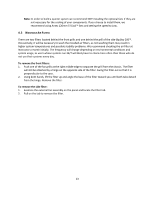
Side Panel TriCool™ Fan - This Big Boy 200™ fan is placed in the side panel of the case, ensuring proper cooling of the hottest graphics cards and motherboard equipment. Big Boy 200™ Specifications: Size: 200 x 30 mm Rated Voltage: DC 12V Operating Voltage: 10.2V ~ 13.8V Speed Input (RPM) Current High 0.3A 800 (Max.) Medium 600 0.17A Low 400 0.08A Air Flow 3.8 m³ / min (134 CFM) 3.1 m³ / min (108 CFM) 2.3 m³ / min (83 CFM) Static Pressure 0.7mm-H2O (0.03 inch-H2O) 0.4mm-H2O (0.02 inch-H2O) 0.2mm-H2O (0.01 inch-H2O) Acoustic Input Noise Power 29 dBA 3.6W 27 dBA 2.0W 24 dBA 1.0W Note: The minimum voltage to start a 120mm TriCool™ fan is 5V. We recommend that you set the fan speed switch to High if you choose to connect the fan(s) to a fan control device or to the Fan-Only connector found on some Antec power supplies. A fan control device regulates the fan speed by varying the voltage, which may start as low as 4.5V to 5V. Connecting a TriCool™ fan set on Medium or Low to a fan-control device may result in the fan not being able to start because the already lowered voltage from the fan control device will be further reduced by the TriCool™ circuitry below 5V. 4.2 OPTIONAL FANS There are three optional 120 mm fan mounts - two front fans and a middle fan (at the rear of the upper HDD cage). These three fans should be installed so that the air is blowing into the case from the front. Front Fans - The front fans are designed to enhance the HDD cooling. Middle Fan - The middle fan is designed to cool the VGA solution in your computer. In this case, the HDD cage acts as a duct, drawing cool air from the front of the case. You can choose to mount only the middle fan or you can mount both the front and the middle fan to enhance cooling. If you decide to mount any HDD into the upper cage you will not be able to use the middle fan. 1. Find the two fan wire brackets from the hardware kit box. 2. Install the wire brackets into the HDD cage. 3. Clip the fan into position. 12
-
 1
1 -
2
-
3
-
4
-
5
-
6
-
7
-
 8
8 -
 9
9 -
 10
10 -
 11
11 -
 12
12 -
 13
13 -
 14
14 -
 15
15
 |
 |