Asko D3120 User manual Quick Start Guide EN - Page 2

Quick St, Uick St, Uick Star, Art Pr, T Procedures, Ocedures - manual

Page 2 highlights

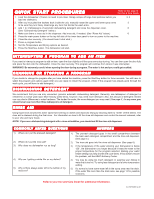
QUICK START PROCEDURES Refer to this page in the Use & Care Guide. 1. Load the dishwasher. (There's no need to pre-rinse. Simply scrape off large food particles before you 3, 4 load the dishware.) 2. After you've pushed the baskets back inside the unit, manually rotate the upper and lower spray arms 3 to be sure they turn freely. Rearrange any item that blocks the wash arms. 3. Add 1 to 3 tablespoons of automatic dishwashing detergent and close the dispenser cover. 5 (See "Dishwashing Detergent" below.) 4. Make sure there is rinse aid in the dispenser. Add rinse aid, if needed. (See "Rinse Aid" below.) 6 5. Press the main power button on the top left side of the inner door panel to turn on power to the machine. 6. Close the door securely. (You should hear it click shut.) 7. Press a program button. 8. Set the Temperature and Drying options as desired. 9. Press the Start/Stop button. The dishwasher will start. INTERRUPTING A PROGRAM TO ADD AN ITEM If you want to interrupt a program to add an item, open the door slightly until the spray arms stop turning. You can then open the door fully and place the item into the dishwasher. Close the door securely. The program will continue from where it was interrupted. WARNING! Be extremely careful when opening the door during a program. The water is hot and you could get scalded. CHANGING OR STOPPING A PROGRAM If you decide to change the program after you have started the machine, press the Start/Stop button for three seconds. You will have to select the program and options again when you are ready to restart the program. (Note: If the program has already gone through the wash cycle, you will have to add detergent.) DISHWASHING DETERGENT We recommend that you use only unscented, granular automatic dishwashing detergent. Generally, one tablespoon of detergent is needed for a normal wash load. More heavily soiled items, however, may need more detergent. Also, the amount of detergent needed can vary due to differences in water hardness. The harder the water, the more detergent you may need. (See page 5.) In any case, you should never use more than three tablespoons of detergent. RINSE AID Using liquid rinse aid prevents water spots from forming on dishes and improves drying by allowing water to "sheet" off the dishes. The rinse aid is released during the final rinse. For information on how to fill the rinse aid dispenser and control the amount released, refer to your Use and Care Guide. NOTE: If you use a dishwashing detergent with a rinse aid additive, you should not fill the rinse aid dispenser. COMMONLY ASKED QUESTIONS ANSWERS 1) Where do I put the prewash detergent? 2) Where do I put the rinse aid? 3) Why does my dishwasher run so long? 4) Why am I getting a white film on my dishes? 5) Why is there always water left in the bottom of my machine? 1) The prewash detergent goes in the small compartment between the main wash detergent compartment and the rinse aid dispenser. (See page 5.) 2) The rinse aid goes into the rinse aid dispenser. (See page 6.) 3) If the temperature of the water entering your dishwasher is below 120°, the dishwasher runs longer because it heats the water to the proper temperature for the program selected. Raising your water heater setting may help shorten the cycle times. If this doesn't resolve the problem, call the ASKO Advisory Center. 4) You may be using too much detergent or washing your dishes in water that is too hot. Try using less detergent and a lower temperature setting. 5) It's normal to have some water left in the sump area near the drain. If the water fills more than the drain area, see page 13 for possible solutions. Refer to your Use and Care Guide for additional information. Art. 8075283 rev 01

  • 1
  • 2

QUICK ST
UICK ST
UICK ST
UICK ST
UICK STAR
AR
AR
AR
ART PR
T PR
T PR
T PR
T PROCEDURES
OCEDURES
OCEDURES
OCEDURES
OCEDURES
1.
Load the dishwasher. (There’s no need to pre-rinse. Simply scrape off large food particles before you
3, 4
load the dishware.)
2.
After you’ve pushed the baskets back inside the unit, manually rotate the upper and lower spray arms
3
to be sure they turn freely. Rearrange any item that blocks the wash arms.
3.
Add 1 to 3 tablespoons of automatic dishwashing detergent and close the dispenser cover.
5
(See “Dishwashing Detergent” below.)
4.
Make sure there is rinse aid in the dispenser. Add rinse aid, if needed. (See “Rinse Aid” below.)
6
5.
Press the main power button on the top left side of the inner door panel to turn on power to the machine.
6.
Close the door securely. (You should hear it click shut.)
7.
Press a program button.
8.
Set the Temperature and Drying options as desired.
9.
Press the Start/
Stop
button. The dishwasher will start.
Refer to your
Use and Care Guide
for additional information.
Refer to this page in
the
Use & Care Guide
.
INTERR
INTERR
INTERR
INTERR
INTERRUPTING
UPTING
UPTING
UPTING
UPTING A PR
A PR
A PR
A PR
A PROGRAM
OGRAM
OGRAM
OGRAM
OGRAM TO
O
O
O
O ADD
ADD
ADD
ADD
ADD AN ITEM
AN ITEM
AN ITEM
AN ITEM
AN ITEM
If you want to interrupt a program to add an item, open the door slightly until the spray arms stop turning. You can then open the door fully
and place the item into the dishwasher. Close the door securely. The program will continue from where it was interrupted.
WARNING!
Be extremely careful when opening the door during a program. The water is hot and you could get scalded.
CHANGING OR STOPPING A PROGRAM
If you decide to change the program after you have started the machine, press the Start/
Stop
button for three seconds. You will have to
select the program and options again when you are ready to restart the program. (
Note:
If the program has already gone through the
wash cycle, you will have to add detergent.)
DISHWASHING DETERGENT
We recommend that you use only unscented, granular automatic dishwashing detergent. Generally, one tablespoon of detergent is
needed for a normal wash load. More heavily soiled items, however, may need more detergent. Also, the amount of detergent needed
can vary due to differences in water hardness. The harder the water, the more detergent you may need. (See page 5.)
In any case, you
should never use more than three tablespoons of detergent.
RINSE AID
RINSE AID
RINSE AID
RINSE AID
RINSE AID
Using liquid rinse aid prevents water spots from forming on dishes and improves drying by allowing water to “sheet” off the dishes. The
rinse aid is released during the final rinse.
For information on how to fill the rinse aid dispenser and control the amount released, refer
to your
Use and Care Guide
.
NOTE:
If you use a dishwashing detergent with a rinse aid additive, you should not fill the rinse aid dispenser.
COMMONL
COMMONL
COMMONL
COMMONL
COMMONLY
Y
Y
Y
Y ASKED Q
ASKED Q
ASKED Q
ASKED Q
ASKED QUESTIONS
UESTIONS
UESTIONS
UESTIONS
UESTIONS
1)
Where do I put the prewash detergent?
2)
Where do I put the rinse aid?
3)
Why does my dishwasher run so long?
4)
Why am I getting a white film on my dishes?
5)
Why is there always water left in the bottom of my
machine?
ANSWERS
ANSWERS
ANSWERS
ANSWERS
ANSWERS
1)
The prewash detergent goes in the small compartment between
the main wash detergent compartment and the rinse aid dispenser.
(See page 5.)
2)
The rinse aid goes into the rinse aid dispenser. (See page 6.)
3)
If the temperature of the water entering your dishwasher is below
120°, the dishwasher runs longer because it heats the water to the
proper temperature for the program selected. Raising your water
heater setting may help shorten the cycle times. If this doesn’t resolve
the problem, call the ASKO Advisory Center.
4)
You may be using too much detergent or washing your dishes in
water that is too hot. Try using less detergent and a lower temperature
setting.
5)
It’s normal to have some water left in the sump area near the drain.
If the water fills more than the drain area, see page 13 for possible
solutions.
Art. 8075283 rev 01