Asko D5636XXLSHI Installation instructions EN - Page 11
Connecting The Electric Cable, Connecting The Water Supply
 |
View all Asko D5636XXLSHI manuals
Add to My Manuals
Save this manual to your list of manuals |
Page 11 highlights
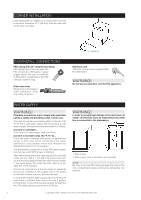
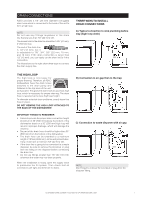
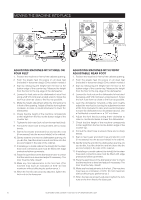
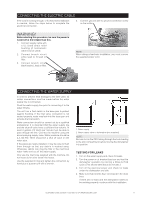
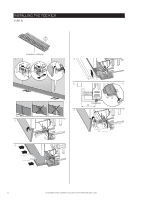
CONNECTING THE ELECTRIC CABLE If the cord is not long enough, or if a hard-wire installation is needed, follow the steps below to complete the electrical connection. 4. Connect ground wire to ground connection screw on the bottom. WARNING! Before starting this procedure, be sure the power is turned off at the breaker/fuse box. 1. Connect supply cable with a UL-listed strain relief bushing (if nonmetallic cable is to be used). 2. Connect branch circuit white lead to N lead on filter. 3. Connect branch circuit black lead to L lead on filter. NOTE: When doing a hard-wire installation, you must remove the supplied power cord. CONNECTING THE WATER SUPPLY In order to prevent heat damage to the inlet valve, all solder connections must be made before the water supply line is connected. Flush the water supply line prior to connecting it to the water fill tube. The unit has a float switch in the base pan to protect against flooding. If the inlet valve connection is not seated properly, water may leak into the base pan and activate the float switch. Water connection should be carried out by a qualified professional. It is important that the water supply line and the shut-off valve have a sufficient flow volume. At least 3 gallons (12 liters) per minute must be able to pass through the line. Connect the machine using the accompanying supply hose. Water pressure should be 4.2-140 PSI. There should be a shut off valve on the water pipe. If the pipes are newly installed, it may be wise to flush them through so that any debris is washed away. Otherwise, debris can clog the filter in the machine's water intake and cut off the water supply. Only use the inlet hose supplied with the machine. Do not reuse old or other loose inlet hoses. Use the supplied O ring and tighten the connection by hand plus a quarter turn with a wrench. 1. Water supply 2. Water supply valve to dishwasher (not supplied) NOTE: Be sure to run the PEX tubing through the hole leading to the sink compartment before moving the dishwasher into position. TESTING FOR LEAKS 1. Turn on the water supply and check for leaks. 2. Turn the power on at breaker/fuse box and test the dishwasher operation by running a Rinse & Hold cycle. (This should take about six minutes.) 3. Turn off the electrical power and check for leaks under the dishwasher and sink. 4. Make sure that no kinks have developed in the drain lines. If there are no leaks and the dishwasher seems to be working properly, continue with the installation. CUSTOMER CARE CENTER 1-800-898-1879 • WWW.ASKONA.COM 11
-
 1
1 -
2
-
3
-
4
-
5
-
 6
6 -
 7
7 -
 8
8 -
 9
9 -
 10
10 -
 11
11 -
 12
12 -
 13
13 -
 14
14 -
 15
15 -
 16
16
 |
 |
