Asko T731 User manual 80 768 12 generell tork EN - Page 14

T731 Opera, T731 Operating Instr, Ting Instr, Ting Instructions, Uctions

Page 14 highlights

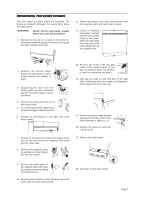
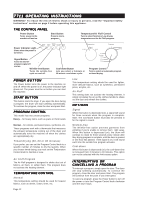
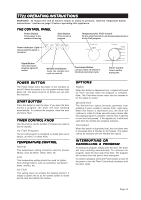
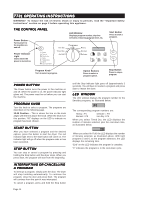
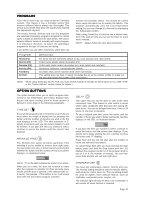
T731 OPERATING INSTRUCTIONS WARNING! To reduce the risk of electric shock or injury to persons, read the "Important Safety Instructions" section on page 2 before operating this appliance. THE CONTROL PANEL Power Button Turns power to the machine on and off. Power Indicator Light Glows when the power is turned on. Power Time set Wrinkle free Delay Temperature Signal Quick cool-down LED Window Displays program number, dry time selected, remaining program time, etc. Iron dry Timed dry Air fluff Programs Heavy Normal Delicate Start Button Press to start a program. Program Knob Turn to select a program. Option Buttons Press to select a program option. Stop Button Press to stop a program. POWER BUTTON The Power button turns the power to the machine on and off. When the power is on, the power indicator light glows red. The power must be on before you can start the machine. PROGRAM KNOB Turn this knob to select a program. The programs are described on the following page. 12:00 Position - This is where the line on the knob aligns with the line above the knob. When the knob is in this position, "00" displays on the LED to indicate no program has been chosen. START BUTTON After you have selected a program and the desired options, press this button to start the dryer. The red indicator light next to the Start button will come on. The indicator light will go off when the program ends or has been cancelled. STOP BUTTON You can stop or cancel a program by pressing and holding the Stop button until the dryer stops. When you press Start, the program will start from the beginning. INTERRUPTING OR CANCELLING A PROGRAM To interrupt a program, simply open the door. The dryer will stop tumbling automatically. To continue the program, close the door and press Start. The program will continue from the point it was interrupted. To cancel a program, press and hold the Stop button Page 14 until the Stop indicator light goes off (approximately 3 seconds). You will have to reselect a program and press Start to restart the dryer. LED WINDOW The LED window displays the program number for the Sensidry programs, as illustrated below: P1 The corresponding program numbers are: Heavy = P1 Normal = P2 Delicate = P3 Iron Dry = P4 When you select Timed Dry, the LED displays the number of minutes selected, plus the cool-down time, as illustrated below: 20 When you select Air Fluff, the LED displays the number of minutes selected, as illustrated above. With both programs 5 and 6, as the program advances, the LED displays the remaining time. "End" on the LED indicates the program is complete. "C" indicates the program is in the cool-down cycle.

  • 1
  • 2
  • 3
  • 4
  • 5
  • 6
  • 7
  • 8
  • 9
  • 10
  • 11
  • 12
  • 13
  • 14
  • 15
  • 16
  • 17
  • 18
  • 19
  • 20
  • 21
  • 22
  • 23
  • 24

Page 14
Heavy
Normal
Delicate
Iron dry
Timed dry
Air fluff
Programs
Power
Time set
Wrinkle free
Delay
Temperature
Signal
Quick cool-down
LED Window
Displays program number, dry time
selected, remaining program time, etc.
Power Button
Turns power to
the machine on
and off.
Power Indicator
Light
Glows when the
power is turned on.
Start Button
Press to start a
program.
PO
PO
PO
PO
POWER BUTT
WER BUTT
WER BUTT
WER BUTT
WER BUTTON
ON
ON
ON
ON
The Power button turns the power to the machine on
and off. When the power is on, the power indicator light
glows red. The power must be on before you can start
the machine.
PR
PR
PR
PR
PROGRAM KNOB
OGRAM KNOB
OGRAM KNOB
OGRAM KNOB
OGRAM KNOB
Turn this knob to select a program. The programs are
described on the following page.
12:00 Position
– This is where the line on the knob
aligns with the line above the knob. When the knob is in
this position, “00” displays on the LED to indicate no
program has been chosen.
ST
ST
ST
ST
STAR
AR
AR
AR
ART BUTT
T BUTT
T BUTT
T BUTT
T BUTTON
ON
ON
ON
ON
After you have selected a program and the desired
options, press this button to start the dryer. The red
indicator light next to the Start button will come on. The
indicator light will go off when the program ends or has
been cancelled.
ST
ST
ST
ST
STOP B
OP B
OP B
OP B
OP BUTT
UTT
UTT
UTT
UTTON
ON
ON
ON
ON
You can stop or cancel a program by pressing and
holding the Stop button until the dryer stops. When you
press Start, the program will start from the beginning.
INTERR
INTERR
INTERR
INTERR
INTERRUPTING OR CANCELLING
UPTING OR CANCELLING
A PR
A PR
A PR
A PR
A PROGRAM
OGRAM
OGRAM
OGRAM
OGRAM
To interrupt a program, simply open the door. The dryer
will stop tumbling automatically. To continue the
program, close the door and press Start. The program
will continue from the point it was interrupted.
To cancel a program, press and hold the Stop button
Program Knob
Turn to select a program.
Stop Button
Press to stop a
program.
THE CONTR
THE CONTR
THE CONTR
THE CONTR
THE CONTROL P
OL P
OL P
OL P
OL PANEL
ANEL
ANEL
ANEL
ANEL
until the Stop indicator light goes off (approximately 3
seconds). You will have to reselect a program and press
Start to restart the dryer.
LED WINDOW
LED WINDOW
LED WINDOW
LED WINDOW
LED WINDOW
The LED window displays the program number for the
Sensidry programs, as illustrated below:
P1
The corresponding program numbers are:
Heavy = P1
Delicate = P3
Normal = P2
Iron Dry = P4
When you select Timed Dry, the LED displays the
number of minutes selected,
plus
the cool-down time,
as illustrated below:
20
When you select Air Fluff, the LED displays the number
of minutes selected, as illustrated above. With both
programs 5 and 6, as the program advances, the LED
displays the remaining time.
“End” on the LED indicates the program is complete.
“C” indicates the program is in the cool-down cycle.
Option Buttons
Press to select a
program option.
T731 OPERA
T731 OPERA
T731 OPERA
T731 OPERA
T731 OPERATING INSTR
TING INSTR
TING INSTR
TING INSTR
TING INSTRUCTIONS
UCTIONS
UCTIONS
UCTIONS
UCTIONS
WARNING!
To reduce the risk of electric shock or injury to persons, read the ”Important Safety
Instructions” section on page 2 before operating this appliance.