Asko T753 User manual 80 891 37 Asko T753 EN - Page 22
Air exhaust
 |
View all Asko T753 manuals
Add to My Manuals
Save this manual to your list of manuals |
Page 22 highlights
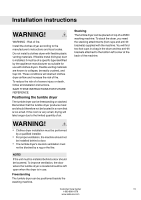
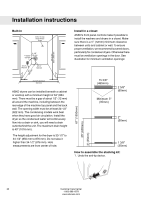
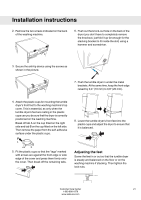
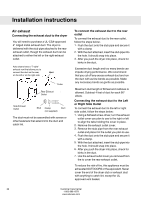
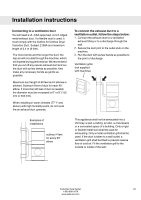
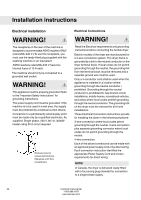
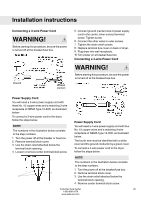
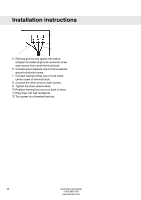
Installation instructions Air exhaust Connecting the exhaust duct to the dryer You will need to purchase a UL-CSA-approved 4" ridged metal exhaust duct. The dryer is delivered with the stub pipe attached to the rear exhaust outlet, though the exhaust duct can be attached to either the left or the right exhaust outlet. Asko dryers have a "T-style" Asko dryersehxahvaeuast vent that allows you to "aTll-oswtilse"yeoxuhtaocuocsnotnnvenecentcttththtehaedt uct on the rear, duct on the roenatrhoer loenft tohreon the right side left or right side. VeVnetnt TT--tutubbee RReeaarrEExxhhaauusstt Outlet Outlet SidSeidEexhEaxuhsatuOsut tlet Outlet SStutbub ClaCmlapmp DDuucct t (no(nt ostuspupplipeldie)d) The duct must not be assembled with screws or other fasteners that extend into the duct and catch lint. To connect the exhaust duct to the rear outlet To connect the exhaust duct to the rear outlet, follow the steps below:. 1. Push the duct onto the stub pipe and secure it with a clamp 2. With the duct attached, insert the stub pipe into the hole. It should snap into place. 3. After you push the dryer into place, check for kinks in the duct. Excessive duct length and too many bends can impede drying performance. We recommend that you cut off any excess exhaust duct and run the duct with as few bends as possible. Make any necessary bends as gentle as possible. Maximum duct length of 60 feet and 4 elbows is allowed. Subtract 4 feet of duct for each 90° elbow. Connecting the exhaust duct to the Left or Right Side Outlet To connect the exhaust duct to the left or right side outlet, follow the steps below: 1. Using a flathead screw-driver, turn the exhaust outlet cover you plan to use to the right or left to align the tabs holding the cover in place. 2. Remove the exhaust outlet cover. 3. Remove the stub pipe from the rear exhaust outlet and place it in the outlet you plan to use. 4. Push the duct onto the stub pipe and secure it with a clamp. 5. With the duct attached, insert the stub pipe into the hole. It should snap into place. 6. After you push the dryer into place, check for kinks in the duct. 7. Use the exhaust outlet cover you removed from the to cover the rear exhaust outlet. To reduce the risk of fire, this appliance must be exhausted OUTDOORS or the equivalent. Never cover the end of the dryer stub or exhaust duct with anything to catch lint, except for UL approved vent basket. 22 Customer Care Center 1-800-898-1879 www.askousa.com
-
 1
1 -
2
-
3
-
4
-
5
-
6
-
7
-
8
-
9
-
10
-
11
-
12
-
13
-
14
-
15
-
16
-
 17
17 -
 18
18 -
 19
19 -
 20
20 -
 21
21 -
 22
22 -
 23
23 -
 24
24 -
 25
25 -
 26
26 -
 27
27 -
28
-
29
-
30
-
31
-
32
 |
 |