Asko T754C User manual 8092760 Asko T754C EN - Page 23
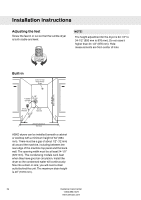
remove the knockout, just fold it up far enough
 |
View all Asko T754C manuals
Add to My Manuals
Save this manual to your list of manuals |
Page 23 highlights
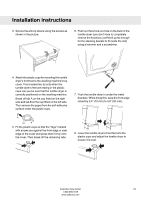
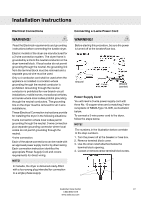
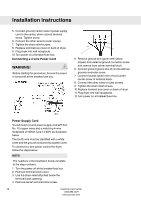
Installation instructions 3. Secure the anti-tip device using the screws as shown in the picture. 6. Push out the knock-out hole on the back of the tumble dryer (you don't have to completely remove the knockout, just fold it up far enough for the stacking bracket to fit inside the slot) using a hammer and a screwdriver. 4. Attach the plastic cups for mounting the tumble dryer's front feet to the washing machine's top cover. This is essential, as only when the tumble dryer's feet are resting in the plastic cups can you be sure that the tumble dryer is correctly positioned on the washing machine. Break off tab A on the cup fitted on the right side and tab B on the cup fitted on the left side. Then remove the paper from the self-adhesive surface under the plastic cups. 7. Push the tumble dryer in under the metal brackets. While doing this, keep the front edge raised by 0,4" (10 mm) to 0,8" (20 mm). AA BB 5. Fit the plastic cups so that the "tags" marked with arrows are against the front edge or side edge of the cover and press them firmly onto the cover. Then break off the remaining tabs. 8. Lower the tumble dryer's front feet into the plastic cups and adjust the tumble dryer to ensure it is level. Customer Care Center 23 1-800-898-1879 www.askousa.com
-
 1
1 -
2
-
3
-
4
-
5
-
6
-
7
-
8
-
9
-
10
-
11
-
12
-
13
-
14
-
15
-
16
-
17
-
 18
18 -
 19
19 -
 20
20 -
 21
21 -
 22
22 -
 23
23 -
 24
24 -
 25
25 -
 26
26 -
 27
27 -
 28
28 -
29
-
30
-
31
-
32
 |
 |
