Asus A7A266 A7A266 User Manual - Page 17
Getting Started - e bios
 |
View all Asus A7A266 manuals
Add to My Manuals
Save this manual to your list of manuals |
Page 17 highlights
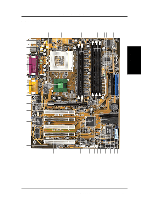
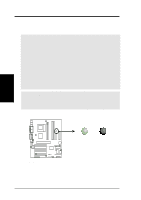
3. HARDWARE SETUP 3.3 Getting Started Before using your computer, you must complete the following steps: 1. Check Motherboard Settings 2. Install Memory Modules 3. Install the Central Processing Unit (CPU) 4. Install Expansion Cards 5. Connect Ribbon Cables, Panel Wires, and Power Supply 6. Setup the BIOS Software 3. H/W SETUP Getting Started ASUS A7A266 User's Manual 17
-
 1
1 -
2
-
3
-
4
-
5
-
6
-
7
-
8
-
9
-
10
-
11
-
 12
12 -
 13
13 -
 14
14 -
 15
15 -
 16
16 -
 17
17 -
 18
18 -
 19
19 -
 20
20 -
 21
21 -
 22
22 -
23
-
24
-
25
-
26
-
27
-
28
-
29
-
30
-
31
-
32
-
33
-
34
-
35
-
36
-
37
-
38
-
39
-
40
-
41
-
42
-
43
-
44
-
45
-
46
-
47
-
48
-
49
-
50
-
51
-
52
-
53
-
54
-
55
-
56
-
57
-
58
-
59
-
60
-
61
-
62
-
63
-
64
-
65
-
66
-
67
-
68
-
69
-
70
-
71
-
72
-
73
-
74
-
75
-
76
-
77
-
78
-
79
-
80
-
81
-
82
-
83
-
84
-
85
-
86
-
87
-
88
-
89
-
90
-
91
-
92
-
93
-
94
-
95
-
96
-
97
-
98
-
99
-
100
 |
 |

ASUS A7A266 User’s Manual
17
3. HARDWARE SETUP
3. H/W SETUP
Getting Started
3.3
Getting Started
Before using your computer, you must complete the following steps:
1.
Check Motherboard Settings
2.
Install Memory Modules
3.
Install the Central Processing Unit (CPU)
4.
Install Expansion Cards
5.
Connect Ribbon Cables, Panel Wires, and Power Supply
6.
Setup the BIOS Software