Asus A8R32-MVP DELUXE A8R32-MVP Deluxe English Edition User's Manual - Page 84
AI Clock Skew for Channel B [Auto] - motherboard manual
 |
View all Asus A8R32-MVP DELUXE manuals
Add to My Manuals
Save this manual to your list of manuals |
Page 84 highlights
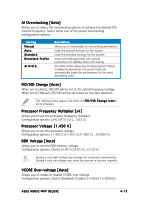
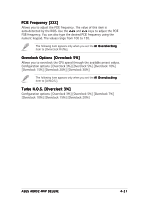
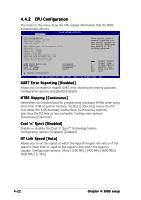
Northbridge Over-voltage [Auto] Configuration options: [Auto] [Disabled] [Enabled] Southbridge Over-voltage [Auto] Configuration options: [Auto] [Disabled] [Enabled] PEG Link Mode [Disabled] Sets the PCI Express graphics (PEG) link mode. Setting this item to [Auto] allows the motherboard to automatically adjust the PCI Express graphics link mode to the correct frequency based on the system configuration. Three additional settings are available for overclocking the PEG Link Mode. Configuration options: [Auto] [Disabled] [Normal] [Fast] [Faster] PEG Buffer Length [Auto] Allows you to set the PEG buffer length. Configuration options: [Auto] [Short] [Long] [Longer] [Longest] AI Clock Skew for Channel A [Auto] Configuration options: [Auto] [Normal] [Advance 150ps] [Advance 300ps] ...[Advance 900] [Delay 150ps] [Delay 300ps]...[Delay 900] Current Clock Skew [Normal] Shows the status of the current clock skew. AI Clock Skew for Channel B [Auto] Configuration options: [Auto] [Normal] [Advance 150ps] [Advance 300ps] ...[Advance 900] [Delay 150ps] [Delay 300ps]...[Delay 900] Current Clock Skew [Normal] Shows the status of the current clock skew. The following items appear only when you set the A I O v e r c l o c k i n g item to [Manual]. CPU Frequency [XXX] Allows you to adjust the CPU frequency. The value of this item is auto-detected by the BIOS. Use the < + > and < - > keys to adjust the CPU FSB frequency. You can also type the desired CPU frequency using the numeric keypad. The values range from 200 to 400. 4-20 Chapter 4: BIOS setup
-
 1
1 -
2
-
3
-
4
-
5
-
6
-
7
-
8
-
9
-
10
-
11
-
12
-
13
-
14
-
15
-
16
-
17
-
18
-
19
-
20
-
21
-
22
-
23
-
24
-
25
-
26
-
27
-
28
-
29
-
30
-
31
-
32
-
33
-
34
-
35
-
36
-
37
-
38
-
39
-
40
-
41
-
42
-
43
-
44
-
45
-
46
-
47
-
48
-
49
-
50
-
51
-
52
-
53
-
54
-
55
-
56
-
57
-
58
-
59
-
60
-
61
-
62
-
63
-
64
-
65
-
66
-
67
-
68
-
69
-
70
-
71
-
72
-
73
-
74
-
75
-
76
-
77
-
78
-
 79
79 -
 80
80 -
 81
81 -
 82
82 -
 83
83 -
 84
84 -
 85
85 -
 86
86 -
 87
87 -
 88
88 -
 89
89 -
90
-
91
-
92
-
93
-
94
-
95
-
96
-
97
-
98
-
99
-
100
-
101
-
102
-
103
-
104
-
105
-
106
-
107
-
108
-
109
-
110
-
111
-
112
-
113
-
114
-
115
-
116
-
117
-
118
-
119
-
120
-
121
-
122
-
123
-
124
-
125
-
126
-
127
-
128
-
129
-
130
-
131
-
132
-
133
-
134
-
135
-
136
-
137
-
138
-
139
-
140
-
141
-
142
-
143
-
144
-
145
-
146
-
147
-
148
-
149
-
150
-
151
-
152
-
153
-
154
-
155
-
156
-
157
-
158
-
159
-
160
-
161
-
162
-
163
-
164
-
165
-
166
-
167
-
168
 |
 |