Asus BP6335 BM6635_BM6835_BP6335 User's Manual - Page 14
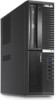
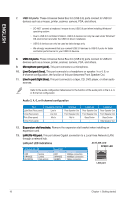
BP6335SD560, Optical disk drive eject button., 25 inch optical disk drive bay., HDD LED.
 |
View all Asus BP6335 manuals
Add to My Manuals
Save this manual to your list of manuals |
Page 14 highlights
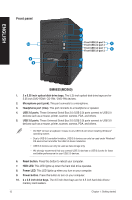
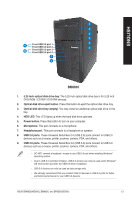
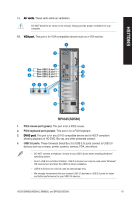
ENGLISH 1 2 3 8 4 Front USB 3.0 port 2 Front USB 3.0 port 1 5 Front USB 2.0 port 3 Front USB 2.0 port 4 7 6 BP6335(SD560) 1. Optical disk drive eject button. Press this button to eject the optical disk drive tray. 2. 5.25 inch optical disk drive bay. The 5.25 inch optical disk drive bay is for 5.25 inch DVD-ROM / CD-RW / DVD-RW devices.� 3. HDD LED. This LED lights up when the hard disk drive operates. 4. USB 3.0 ports. These Universal Serial Bus 3.0 (USB 3.0) ports connect to USB 3.0 devices such as a mouse, printer, scanner, camera, PDA, and others. • DO NOT connect a keyboard / mouse to any USB 3.0 port when installing Windows® operating system. • Due to USB 3.0 controller limitation, USB 3.0 devices can only be used under Windows® OS environment and after the USB 3.0 driver installation. • USB 3.0 devices can only be used as data storage only. • We strongly recommend that you connect USB 3.0 devices to USB 3.0 ports for faster and better performance for your USB 3.0 devices. 5. USB 2.0 ports. These Universal Serial Bus 2.0 (USB 2.0) ports connect to USB 2.0 devices such as a mouse, printer, scanner, camera, PDA, and others. 6. Microphone. This port connects to a microphone. 7. Headphone port. This port connects to a headphone or speaker. 8. Power button. Press this button to turn on your computer. 14 Chapter 1: Getting started
-
 1
1 -
2
-
3
-
4
-
5
-
6
-
7
-
8
-
 9
9 -
 10
10 -
 11
11 -
 12
12 -
 13
13 -
 14
14 -
 15
15 -
 16
16 -
 17
17 -
 18
18 -
 19
19 -
20
-
21
-
22
-
23
-
24
-
25
-
26
-
27
-
28
-
29
-
30
-
31
-
32
-
33
-
34
-
35
-
36
-
37
-
38
-
39
-
40
-
41
-
42
-
43
-
44
-
45
-
46
-
47
-
48
-
49
-
50
-
51
-
52
-
53
-
54
-
55
-
56
-
57
-
58
-
59
-
60
-
61
-
62
-
63
-
64
-
65
-
66
-
67
-
68
-
69
-
70
-
71
-
72
 |
 |
