Asus CP6130 User Manual - Page 12
ENGLISH, Rear panel - 10
 |
View all Asus CP6130 manuals
Add to My Manuals
Save this manual to your list of manuals |
Page 12 highlights
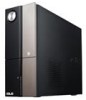
ENGLISH 1. ���P�o�w�e�r��b�u�tt�o�n�. Press this button to turn on your computer. 2. ���O��p�t�ic�a�l��d�is�k��d�r�i�v�e�e��j�e�c�t�b��u�t�to��n�. Press this button to eject the optical disk drive tray. 3. ���O��p�t�ic�a��l �d�is��k�d��ri�v�e��b�a�y�. There is an optical disk drive in this bay. 4. ���M��ic�r�o�p�h�o�n�e��p�o�r�t �(�p�in�k��)�. This port connects to a microphone. 5. ���H�e�a�d�p�h�o�n��e�p�o�r�t �(�li�m�e��)�. This port connects to a headphone or speaker. 6. ���U�S��B�2�.�0�p��o�rt�s�. These Universal Serial Bus 2.0 (USB 2.0) ports connect to USB 2.0 devices such as a mouse, printer, scanner, camera, PDA, and others. 7. ���M��u�l�ti�M�e��d�ia�C��a�r�d�/�S��e�c�u�r�e��D�ig��it�a�l M�e�m��o�r�y��S�t�ic�k M�e�m��o�r�y��S�t�ic��k�P��ro c��a�r�d� slot. Insert a MultiMediaCard / Secure Digital™ / Memory Stick™ / Memory Stick Pro™ card into this slot. 8. ���F��ro��n�t�I�/O��p�o��rt�s��c�o�v�e�r�. Rear panel 1 1 14 13 12 2 9 10 11 3 8 1 4 7 5 6 1. ���A�i�r�v�e�n�t�s�. These vents allow air ventilation. DO NOT block the air vents on the chassis. Always provide proper ventilation for your computer. 2. ���P�o�w��e�r�c�o�n�n��e�c�to�r�. Plug the power cord to this connector. 12 Chapter 1: Getting started
-
 1
1 -
2
-
3
-
4
-
5
-
6
-
 7
7 -
 8
8 -
 9
9 -
 10
10 -
 11
11 -
 12
12 -
 13
13 -
 14
14 -
 15
15 -
 16
16 -
 17
17 -
18
-
19
-
20
-
21
-
22
-
23
-
24
-
25
-
26
-
27
-
28
-
29
-
30
-
31
-
32
-
33
-
34
-
35
-
36
-
37
-
38
-
39
-
40
-
41
-
42
-
43
-
44
-
45
-
46
-
47
-
48
-
49
-
50
-
51
-
52
-
53
-
54
-
55
-
56
-
57
-
58
-
59
-
60
-
61
-
62
-
63
-
64
 |
 |
