Asus ET2203T-B0317 User Manual
Asus ET2203T-B0317 - Eee Top Manual
 |
UPC - 610839064090
View all Asus ET2203T-B0317 manuals
Add to My Manuals
Save this manual to your list of manuals |
Asus ET2203T-B0317 manual content summary:
- Asus ET2203T-B0317 | User Manual - Page 1
English User Manual ET24 Series - Asus ET2203T-B0317 | User Manual - Page 2
, except documentation kept by the purchaser for backup purposes, without the express written permission of ASUSTeK COMPUTER, INC. ("ASUS"). Products and corporate names mentioned in this manual may or may not be registered trademarks or copyrights of their respective companies, and are used for - Asus ET2203T-B0317 | User Manual - Page 3
of Communications Statement 6 IC Radiation Exposure Statement for Canada 6 Declaration of Conformity (R&TTE directive 1999/5/EC 6 Global Environmental Regulation Compliance and Declaration 10 Takeback Services...10 Notes for this manual...11 Safety information...12 Setting up your system...12 - Asus ET2203T-B0317 | User Manual - Page 4
English Connecting the wireless keyboard and mouse 27 Powering on the system...28 Powering off...28 Configuring a wireless connection 29 Configuring a wired connection 30 Using a static IP...30 Using a dynamic IP (PPPoE 32 Configuring the audio output...35 Speaker configurations...35 Connecting - Asus ET2203T-B0317 | User Manual - Page 5
could void the user's authority to operate the equipment. RF exposure warning This equipment must be installed and operated in accordance with provided instructions and the antenna(s) used for this transmitter must be installed to provide a separation distance of at least 20 cm from all persons and - Asus ET2203T-B0317 | User Manual - Page 6
complies with Canadian ICES-003. IC Radiation Exposure Statement for Canada This equipment complies with IC radiation exposure limits set forth antenna during transmitting. End users must follow the specific operating instructions for satisfying RF exposure compliance. Operation is subject to - Asus ET2203T-B0317 | User Manual - Page 7
English CE Mark Warning This is a Class B product, in a domestic environment, this product may cause radio interference, in which case the user may be required to take adequate measures. CE marking for devices without wireless LAN/Bluetooth The shipped version of this device complies with the - Asus ET2203T-B0317 | User Manual - Page 8
English France Restricted Wireless Frequency Bands Some areas of France have a restricted frequency band. The worst case maximum authorized power indoors are: • 10mW for the entire 2.4 GHz band (2400 MHz-2483.5 MHz) • 100mW for frequencies between 2446.5 MHz and 2483.5 MHz Channels 10 through 13 - Asus ET2203T-B0317 | User Manual - Page 9
recommended by the manufacturer. Dispose of used batteries according to the manufacturer's instructions. No Exposure to Liquids DO NOT expose to or use near liquids, publish the chemical substances in our products at ASUS REACH website at http://csr.asus.com/english/REACH.htm. TV Tuner Notices Note - Asus ET2203T-B0317 | User Manual - Page 10
is complied with: Japan JIS-C-0950 Material Declarations EU REACH SVHC Korea RoHS Swiss Energy Laws Takeback Services ASUS recycling and takeback programs come from our commitment to the highest standards for protecting our environment. We believe in providing solutions for our customers to - Asus ET2203T-B0317 | User Manual - Page 11
used throughout this manual. WARNING: Vital information that you MUST follow to prevent injury to yourself. IMPORTANT: Instructions that you MUST manual are for reference only. Actual product specifications and software screen images may vary with territories. Visit the ASUS website at www.asus - Asus ET2203T-B0317 | User Manual - Page 12
that you read the following safety instructions. Setting up your system • Read and follow all instructions in the documentation before you • If you encounter the following technical problems with the product, unplug the power cord and contact a qualified service technician or your retailer. • The - Asus ET2203T-B0317 | User Manual - Page 13
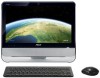
Keyboard (wired or wireless) Mouse (wired or wireless) Quick Guide AC adapter Power cord Quick start guide Warranty card TV USB dongle (optional) KBM USB receiver dongle are for reference only. Actual product specifications may vary with territories. All-in-one PC ET24 Series 13 - Asus ET2203T-B0317 | User Manual - Page 14
English Getting to know your All-in-one PC Front view Refer to the following diagram to identify the components on this side of the system. 1 2 3 14 All-in-one PC ET24 Series - Asus ET2203T-B0317 | User Manual - Page 15
English 1 Webcam The built-in webcam with the built-in digital microphone allows you to start video chats online. 2 LCD display (Touch-enabled function on selected models) The 23.6-inch LCD display, with an optimal resolution of 1600 x 900 or 1920 x 1080, features touch function that - Asus ET2203T-B0317 | User Manual - Page 16
Rear view Refer to the following diagram to identify the components on this side of the system. English 1 2 3 45 6 1 Power input (DC 19V) The supplied power adapter converts AC power to DC power for use with this jack. Power supplied through this jack supplies power to the PC. To prevent - Asus ET2203T-B0317 | User Manual - Page 17
digital TV, analog TV, depending on paid services. 6 USB port The Universal Serial Bus (USB) port is compatible with USB devices such as keyboards, mouse devices, cameras, and hard disk drives. The USB ports may support USB 2.0 or USB 3.0 specifications depending on your model. The number of - Asus ET2203T-B0317 | User Manual - Page 18
-in speakers. 5 Optical Drive The built-in optical drive may support compact discs (CD) and/or digital video discs (DVD), and may have 5 recordable (R) or re-writable (RW) capabilities. See the 6 marketing specifications for details on each model. 7 8 6 Power switch 9 The power - Asus ET2203T-B0317 | User Manual - Page 19
English 7 Up Button Press to display the volume or brightness menu directly. Or use it to scroll up when navigating other menus. The button definition varies with models. 8 Menu Button Press to display the main menu. The menu options vary with models. 9 Down Button Press to - Asus ET2203T-B0317 | User Manual - Page 20
English Using the touch screen All-in-one PC brings digital life to your fingertips. With a few touches, you can make All-in-one PC work at your command. Your touch functions like a mouse device: • Touch = left-click on the mouse • Touch and hold = right-click on the mouse The touch-enabled screen - Asus ET2203T-B0317 | User Manual - Page 21
English 2. Click Change touch input settings. 3. Click the Touch tab on the top and click 4. You will see a virtual mouse on the screen the box before Show the touch pointer when you touch the screen. when I'm interacting with - Asus ET2203T-B0317 | User Manual - Page 22
English Using the keyboard Your All-in-one PC comes with a wired or wireless keyboard that facilitates your control of the system. The following keyboard illustration is for reference only. Actual product specifications may vary with territories. 22 All-in-one PC ET24 Series - Asus ET2203T-B0317 | User Manual - Page 23
on the keyboard. To access the colored commands, hold the Function key while pressing a key with a colored command. The actual colored function keys and supported commands may vary with models. Fn + F1: Places the system in suspend mode. Fn + F2: Toggles the internal wireless LAN or Bluetooth (on - Asus ET2203T-B0317 | User Manual - Page 24
English Positioning your All-in-one PC Placing on the desktop Place your All-in-one PC on a flat surface such as a table or desk, pull the stand open, and tilt the display panel to an angle of between 12 and 25 degrees from an upright position. When you tilt the display panel to the angle of 12 - Asus ET2203T-B0317 | User Manual - Page 25
wall mount pad adapter, wall mount pad and a wall mount kit. Install the wall mount pad according to the following instructions. The following instructions are for reference only.The actual installation procedures may vary depending on your purchased wall mount kit. 1. Remove the four screws - Asus ET2203T-B0317 | User Manual - Page 26
. The wall mount kit in this illustration is for reference only. 5. Fasten the wall mount kit to the wall following the instructions described in the installation manual that came with your wall mount kit package. For ventilation's sake, ensure that you leave a distance of 6cm at least between - Asus ET2203T-B0317 | User Manual - Page 27
connect with the All-inone PC. 4. You can begin using the wireless keyboard and mouse. The illustrations above are for reference only. Actual appearances and specifications (wired or wireless) of the keyboard and mouse may vary with territories. All-in-one PC ET24 Series 27 - Asus ET2203T-B0317 | User Manual - Page 28
English Powering on the system Connect the supplied AC adapter to the DC IN jack on the rear panel ( 1 2 3 ) and then press the Power switch on the right ( 4 ) to turn on the system. 2 3 1 4 WARNING! DO NOT connect the AC power cord to an AC outlet prior to connecting the DC plug to the system - Asus ET2203T-B0317 | User Manual - Page 29
English Configuring a wireless connection 1. Click the wireless network icon with an orange star in the Windows® Notification area. 2. Select the wireless access point you want to connect to from the list and click Connect to build the connection. If you cannot find the desired access point, click - Asus ET2203T-B0317 | User Manual - Page 30
English Configuring a wired connection Using a static IP 1. Click the network icon with a yellow warning triangle in the Windows® Notification area and select Open Network and Sharing Center. Ensure that you have connected the LAN cable to the All-in-one PC. 2. Click Change adapter settings in the - Asus ET2203T-B0317 | User Manual - Page 31
English 4. Click Internet Protocol Version 4(TCP/ IPv4) and click Properties. 5. Select Use the following IP address. 6. Enter your IP address, Subnet mask, and Default gateway. 7. If needed, enter the Preferred DNS server address. 8. After entering all the related values, click OK to finish the - Asus ET2203T-B0317 | User Manual - Page 32
English Using a dynamic IP (PPPoE) 1. Repeat steps 1-4 in the previous section. 2 Select Obtain an IP address automatically and click OK. (Continue the following steps if using PPPoE) 3. Return to the Network and Sharing Center and then click Set up a new connection or network. 4. Select Connect to - Asus ET2203T-B0317 | User Manual - Page 33
English 5. Select Broadband (PPPoE) and click Next. 6. Enter your User name and, Password, and Connection name. Click Connect. 7. Click Close to finish the configuration. All-in-one PC ET24 Series 33 - Asus ET2203T-B0317 | User Manual - Page 34
English 8. Click the network icon in the notification area and click the connection you just created. 9. Enter your user name and password. Click Connect to connect to the Internet. 34 All-in-one PC ET24 Series - Asus ET2203T-B0317 | User Manual - Page 35
English Configuring the audio output All-in-one PC supports different types of audio configurations. Set up the system using stereo speakers. Speaker configurations Set up the system with the following speaker configurations: Name Speaker - Asus ET2203T-B0317 | User Manual - Page 36
English Configuring audio output settings After connecting a speaker system to your All-in-one PC, follow the steps below to configure the speaker settings: 1. Right-click the speaker icon in the Windows® notification area and click Sounds. 2. Select a playback device and click Properties to - Asus ET2203T-B0317 | User Manual - Page 37
English Overclocking your All-in-one PC 1. Click the S.H.E. button on the speedometer on the desktop. 2. The system will restart automatically to finish the overclocking process. Click OK to continue. 3. The pointer will move from High to Super as shown. Click the S.H.E. button again to undo the - Asus ET2203T-B0317 | User Manual - Page 38
performance by decreasing hard disk access. Visit an authorized service center or retailer for information on memory upgrades for memory based on your needs as instructed bellow. installing memory removing memory 3 Visit the ASUS support site at http://support.asus.com for the latest memory QVL. - Asus ET2203T-B0317 | User Manual - Page 39
English Recovering your system Using the hidden partition The recovery partition includes an image of the operating system, drivers, and utilities installed on your system at the factory.The recovery partition provides a comprehensive recovery solution that quickly restores your system's software - Asus ET2203T-B0317 | User Manual - Page 40
English 5. Based on the different situations in the previous step, data on the selected USB storage device or on the selected partition will be cleared. Click Backup to start backup. You will lose all your data on the selected USB storage device or on the selected partition. Ensure to back up your - Asus ET2203T-B0317 | User Manual - Page 41
English All-in-one PC ET24 Series 41 - Asus ET2203T-B0317 | User Manual - Page 42
English Manufacturer ASUSTek COMPUTER INC. Address, City No. 150, LI-TE RD., PEITOU, TAIPEI 112, TAIWAN R.O.C Country TAIWAN Authorized Representative in Europe ASUS COMPUTER GmbH Address, City HARKORT STR. 21-23, 40880 RATINGEN Country GERMANY 42 All-in-one PC ET24 Series
-
 1
1 -
 2
2 -
 3
3 -
 4
4 -
 5
5 -
 6
6 -
 7
7 -
8
-
9
-
10
-
11
-
12
-
13
-
14
-
15
-
16
-
17
-
18
-
19
-
20
-
21
-
22
-
23
-
24
-
25
-
26
-
27
-
28
-
29
-
30
-
31
-
32
-
33
-
34
-
35
-
36
-
37
-
38
-
39
-
40
-
41
-
42
 |
 |
English
User Manual
ET24 Series