Asus K8S-MX K8S-MX English User Manual E1884 - Page 79
<Q>, <N>, <Enter>, <Y>, up/down
 |
View all Asus K8S-MX manuals
Add to My Manuals
Save this manual to your list of manuals |
Page 79 highlights
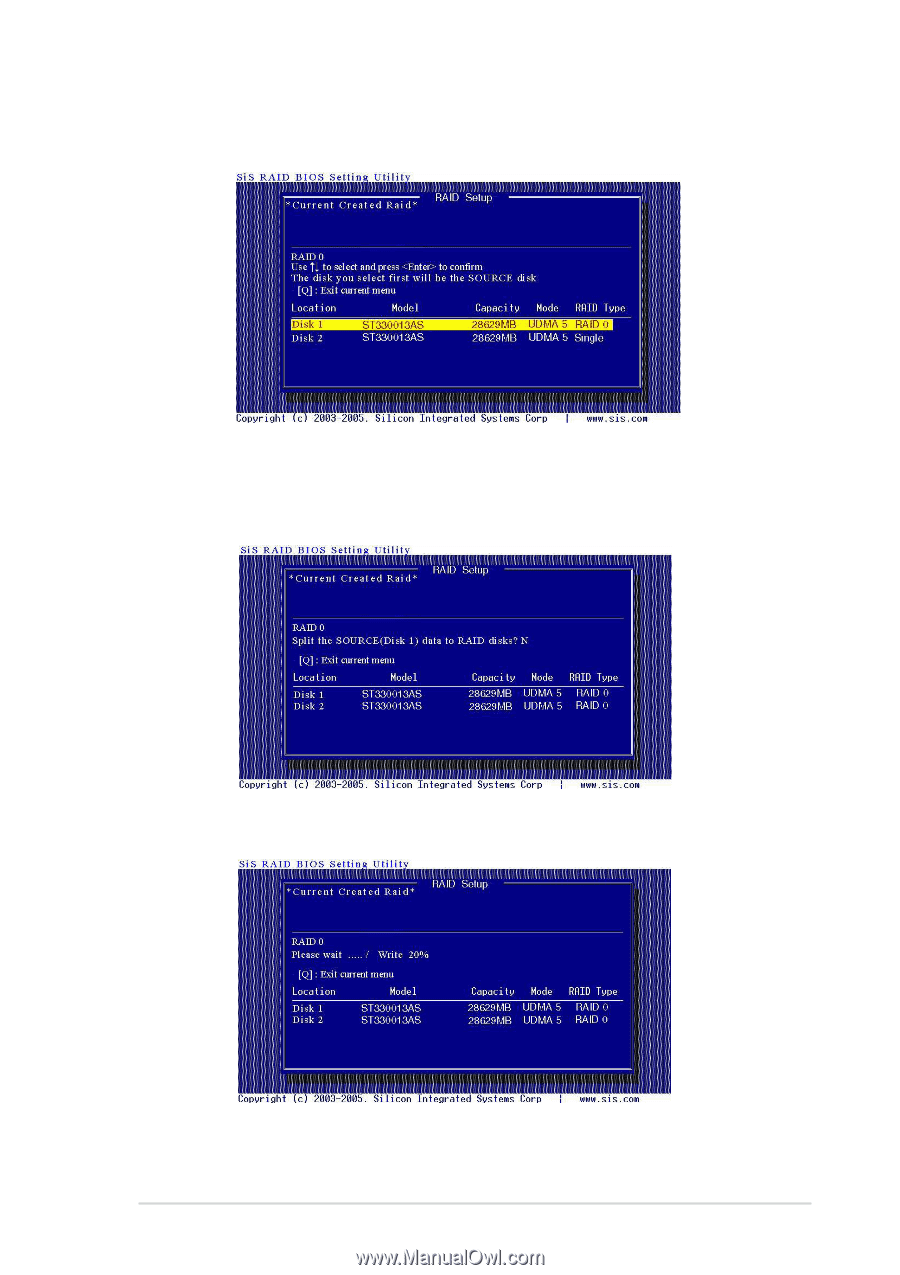
5. Use the up/down arrow keys to move the selection bar, then press to select a disk drive. 6. After selecting the drives, press to return to previous menu. 7. Press then to create a Stripe only configuration. Press if you wish to split the data on the source disk to other disks. 8. If you selected Y, the following screen appears. 9. When finished, press to return to previous menu. ASUS K8S-MX motherboard 3-11
-
 1
1 -
2
-
3
-
4
-
5
-
6
-
7
-
8
-
9
-
10
-
11
-
12
-
13
-
14
-
15
-
16
-
17
-
18
-
19
-
20
-
21
-
22
-
23
-
24
-
25
-
26
-
27
-
28
-
29
-
30
-
31
-
32
-
33
-
34
-
35
-
36
-
37
-
38
-
39
-
40
-
41
-
42
-
43
-
44
-
45
-
46
-
47
-
48
-
49
-
50
-
51
-
52
-
53
-
54
-
55
-
56
-
57
-
58
-
59
-
60
-
61
-
62
-
63
-
64
-
65
-
66
-
67
-
68
-
69
-
70
-
71
-
72
-
73
-
 74
74 -
 75
75 -
 76
76 -
 77
77 -
 78
78 -
 79
79 -
 80
80 -
 81
81 -
 82
82 -
 83
83 -
 84
84
 |
 |
ASUS K8S-MX motherboard
3-11
6.
After selecting the drives, press
<Q>
to return to previous menu.
7.
Press
<N>
then
<Enter>
to create a Stripe only configuration. Press
<Y>
if you
wish to split the data on the source disk to other disks.
5.
Use the
up/down
arrow keys to move the selection bar, then press
<Enter>
to
select a disk drive.
8.
If you selected Y, the following screen appears.
9.
When finished, press
<Q>
to return to previous menu.