Asus M2N68-AM SE2 User Manual - Page 15
Expansion slots - overclock
 |
UPC - 610839169214
View all Asus M2N68-AM SE2 manuals
Add to My Manuals
Save this manual to your list of manuals |
Page 15 highlights
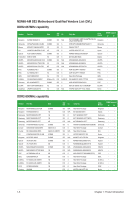
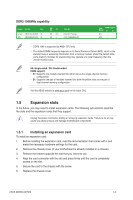
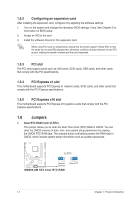
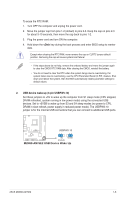
DDR2-1066MHz capability Vendor Part No. Size Corsair CM2X1024-8500C5 1G GEIL GB24GB8500C5QC 1G SS/ DS CL DS N/A SS 5 Chip No. Heat-Sink Package GL2L128M88BA25AB Chip DIMM support Brand A* B* N/A • • GEIL • • • DDR2 1066 is supported by AM2+ CPU only. • The default DIMM frequency depends on its Serial Presence Detect (SPD), which is the standard way of accessing information from a memory module. Under the default state, some memory modules for overclocking may operate at a lower frequency than the vendor-marked value. SS: Single-sided / DS: Double-sided DIMM support: • A*: Supports one module inserted into either slot as the single-channel memory configuration. • B*: Supports one pair of modules inserted into both the yellow slots as one pair of dual-channel memory configuration. Visit the ASUS website at www.asus.com for the latest QVL. 1.5 Expansion slots In the future, you may need to install expansion cards. The following sub-sections describe the slots and the expansion cards that they support. Unplug the power cord before adding or removing expansion cards. Failure to do so may cause you physical injury and damage motherboard components. 1.5.1 Installing an expansion card To install an expansion card: 1. Before installing the expansion card, read the documentation that comes with it and make the necessary hardware settings for the card. 2. Remove the chassis cover (if your motherboard is already installed in a chassis). 3. Remove the bracket opposite the slot that you intend to use. 4. Align the card connector with the slot and press firmly until the card is completely seated on the slot. 5. Secure the card to the chassis with the screw. 6. Replace the chassis cover. ASUS M2N68-AM SE2 1-6
-
 1
1 -
2
-
3
-
4
-
5
-
6
-
7
-
8
-
9
-
 10
10 -
 11
11 -
 12
12 -
 13
13 -
 14
14 -
 15
15 -
 16
16 -
 17
17 -
 18
18 -
 19
19 -
 20
20 -
21
-
22
-
23
-
24
-
25
-
26
-
27
-
28
-
29
-
30
-
31
-
32
-
33
-
34
-
35
-
36
-
37
-
38
-
39
-
40
 |
 |