Asus M2R32-MVP M2R32-MVP English Edition User's Manual - Page 140
Installing hard disks, RAID configurations - driver windows 7
 |
UPC - 610839141074
View all Asus M2R32-MVP manuals
Add to My Manuals
Save this manual to your list of manuals |
Page 140 highlights
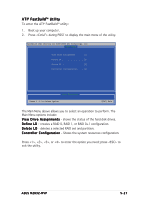
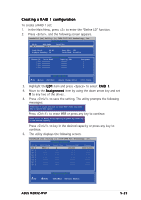
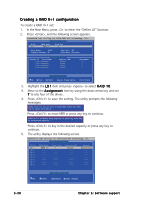
5.4.1 Installing hard disks The motherboard supports Ultra DMA 133/100/66 and Serial ATA hard disk drives. For optimal performance, install identical drives of the same model and capacity when creating a disk array. Installing Serial ATA (SATA) hard disks To install the SATA hard disks for a RAID configuration: 1. Install the SATA hard disks into the drive bays. 2. Connect the SATA signal cables. 3. Connect a SATA power cable to the power connector on each drive. 5.4.2 ATI® RAID configurations The ATI® RAID controller supports RAID 0, RAID 1, and RAID 0+1configurations. You may also set the RAID configurations in Windows® OS after you have installed the Serial ATA RAID driver. See section "5.2.4 Make Disk menu" for details. Setting the RAID item in BIOS You must set the RAID item in the BIOS Setup before you can create a RAID set(s). To do this: 1. Boot up your computer, and press during POST to enter the BIOS setup. 2. In the M a i n M e n u, go to S t o r a g e C o n f i g u r a t i o n, and set the O n C h i p S A T A T y p e item to [RAID]. 3. Press to save the changes and exit. The RAID BIOS setup screens shown in this section are for reference only, and may not exactly match the items on your screen. 5-26 Chapter 5: Software support
-
 1
1 -
2
-
3
-
4
-
5
-
6
-
7
-
8
-
9
-
10
-
11
-
12
-
13
-
14
-
15
-
16
-
17
-
18
-
19
-
20
-
21
-
22
-
23
-
24
-
25
-
26
-
27
-
28
-
29
-
30
-
31
-
32
-
33
-
34
-
35
-
36
-
37
-
38
-
39
-
40
-
41
-
42
-
43
-
44
-
45
-
46
-
47
-
48
-
49
-
50
-
51
-
52
-
53
-
54
-
55
-
56
-
57
-
58
-
59
-
60
-
61
-
62
-
63
-
64
-
65
-
66
-
67
-
68
-
69
-
70
-
71
-
72
-
73
-
74
-
75
-
76
-
77
-
78
-
79
-
80
-
81
-
82
-
83
-
84
-
85
-
86
-
87
-
88
-
89
-
90
-
91
-
92
-
93
-
94
-
95
-
96
-
97
-
98
-
99
-
100
-
101
-
102
-
103
-
104
-
105
-
106
-
107
-
108
-
109
-
110
-
111
-
112
-
113
-
114
-
115
-
116
-
117
-
118
-
119
-
120
-
121
-
122
-
123
-
124
-
125
-
126
-
127
-
128
-
129
-
130
-
131
-
132
-
133
-
134
-
 135
135 -
 136
136 -
 137
137 -
 138
138 -
 139
139 -
 140
140 -
 141
141 -
 142
142 -
 143
143 -
 144
144 -
 145
145 -
146
-
147
-
148
-
149
-
150
-
151
-
152
-
153
-
154
-
155
-
156
-
157
-
158
-
159
-
160
 |
 |