Asus OC Panel Setup Guide - Page 1
Asus OC Panel Manual
 |
View all Asus OC Panel manuals
Add to My Manuals
Save this manual to your list of manuals |
Page 1 highlights
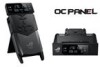
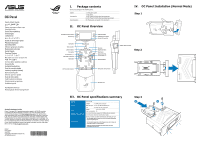
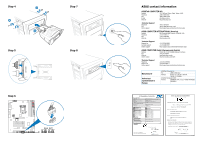
OC Panel Quick Start Guide Stručná příručka Quick Start-vejledning Snelstartgids Lühijuhend Guide de démarrage rapide Pikakäynnistysopas Schnellstarthilfe Beüzemelési útmutató Guida Rapida Panduan Ringkas Greitos darbo pradžios vadovas Īsa pamācība Hurtigstartsveiledning Guia de consulta rápida Instrukcja szybkiej instalacji Ghid de pornire rapidă Guía de inicio rápida Vodič za brzo korišćenje Stručný návod na spustenie Snabbstartsguide Hızlı Başlatma Kılavuzu Höôùng daãn khôûi ñoäng nhanh Start Reset REPUBLIC OF GAMERS I. Package contents Check your package for the following items. Cables Accessories Documentation 1 x ROG_EXT cable 1 x OC Panel 1 x OC Panel 5.25-inch drive bay metal case 2 x OC Panel 5.25-inch drive bay metal case screws OC Panel quick start guide (This document) II. OC Panel Overview IV. OC Panel Installation (Normal Mode) Step 1 Clear OK Reset Normal/Extreme Mode switch CPU Level up OC Start button Value up button Left Arrow button Clear button Fan connectors 1,2 VGA hotwire connectors VGA hotwire Start OK Clear Reset ON ON OFF OFF LCM Power button FanSpeed Control button 2.6-inch OC Panel LCM OK button Right Arrow button Reset button Value Down button Fan connectors 3,4 Pause/Slow Mode OC Start Subzero Sense connector OK Step 2 Clear Reset OC Start OK Clear Reset ON ON OFF OFF OC Panel cable connector SATA power cable connector OC Panel cover Australia statement notice From 1 January 2012 updated warranties apply to all ASUS products, consistent with the Australian Consumer Law. For the latest product warranty details please visit http://support.asus.com. Our goods come with guarantees that cannot be excluded under the Australian Consumer Law. You are entitled to a replacement or refund for a major failure and compensation for any other reasonably foreseeable loss or damage. You are also entitled to have the goods repaired or replaced if the goods fail to be of acceptable quality and the failure does not amount to a major failure. If you require assistance please call ASUS Customer Service 1300 2787 88 or visit us at http://support.asus.com Q8567 First Edition July 2013 Copyright © ASUSTeK Computer Inc. All Rights Reserved 15060-25010000 III. OC Panel specifications summary Step 3 Display 2.6-inch LCM A B I/O Ports Power Installation Requirements Compatibility POWER : 1 x SATA power connector ROG_EXT port : 1 x 18-1 pin data connection port FAN : 4 x 4-pin extra fan connectors Voltage : +12V, +5V, +5VSB Power consumption : 5A 1 x 5.25-inch drive bay required for NORMAL Mode installation 1 x SATA power cable from system power supply Maximus VI Series and other motherboards with ROG_EXT port • Visit the ASUS website at www.asus.com for the latest motherboard support/compatibility lists. • Visit the ASUS Support site at http://support.asus.com to check and download the latest OC Panel firmware. • Update the motherboard BIOS to the latest version for better compatibility with OC Panel.
-
 1
1 -
 2
2
 |
 |