Asus P5KR Motherboard Installation Guide - Page 145
RAID Configuration
 |
View all Asus P5KR manuals
Add to My Manuals
Save this manual to your list of manuals |
Page 145 highlights
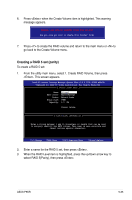
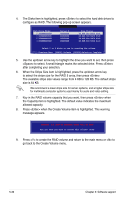
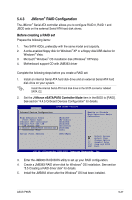
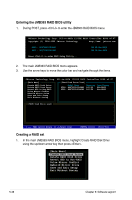
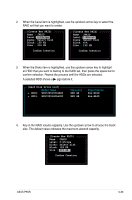
5.4.3 JMicron® RAID Configuration The JMicron® Serial ATA controller allows you to configure RAID 0, RAID 1 and JBOD sets on the external Serial ATA hard disk drives. Before creating a RAID set Prepare the following items: 1. Two SATA HDDs, preferably with the same model and capacity. 2. A write-enabled floppy disk for Windows® XP or a floppy disk/USB device for Windows® Vista. 3. Microsoft® Windows® OS installation disk (Windows® XP/Vista) 4. Motherboard support CD with JMB363 driver Complete the following steps before you create a RAID set: 1. Install an internal Serial ATA hard disk drive and an external Serial ATA hard disk drive on your system. Install the internal Serial ATA hard disk drive to the SATA connector labeled SATA_E2. 2. Set the J-Micron eSATA/PATA Controller Mode item in the BIOS to [RAID]. See section "4.4.5 Onboard Devices Configuration" for details. Advanced Onboard Device Configuraiton BIOS SETUP UTILITY High Definition Audio Front Panel Type Onboard 1394 Controller Onboard PCIE GbE LAN LAN Option ROM J-Micron eSATA/PATA Controller Controller Mode [Enabled] [HD Audio] [Enabled] [Enabled] [Disabled] [Enabled] [IDE] Serial Port1 Address [3F8/IRQ4] Enable or Disable High Definition Audio Controller Select Screen Select Item +- Change Option F1 General Help F10 Save and Exit ESC Exit v02.58 (C)Copyright 1985-2007, American Megatrends, Inc. 3. Enter the JMB363 RAID BIOS utility to set up your RAID configuration. 4. Create a JMB363 RAID driver disk for Windows® OS installation. See section "5.5 Creating a RAID driver disk" for details. 5. Install the JMB363 driver after the Windows® OS had been installed. ASUS P5KR 5-37
-
 1
1 -
2
-
3
-
4
-
5
-
6
-
7
-
8
-
9
-
10
-
11
-
12
-
13
-
14
-
15
-
16
-
17
-
18
-
19
-
20
-
21
-
22
-
23
-
24
-
25
-
26
-
27
-
28
-
29
-
30
-
31
-
32
-
33
-
34
-
35
-
36
-
37
-
38
-
39
-
40
-
41
-
42
-
43
-
44
-
45
-
46
-
47
-
48
-
49
-
50
-
51
-
52
-
53
-
54
-
55
-
56
-
57
-
58
-
59
-
60
-
61
-
62
-
63
-
64
-
65
-
66
-
67
-
68
-
69
-
70
-
71
-
72
-
73
-
74
-
75
-
76
-
77
-
78
-
79
-
80
-
81
-
82
-
83
-
84
-
85
-
86
-
87
-
88
-
89
-
90
-
91
-
92
-
93
-
94
-
95
-
96
-
97
-
98
-
99
-
100
-
101
-
102
-
103
-
104
-
105
-
106
-
107
-
108
-
109
-
110
-
111
-
112
-
113
-
114
-
115
-
116
-
117
-
118
-
119
-
120
-
121
-
122
-
123
-
124
-
125
-
126
-
127
-
128
-
129
-
130
-
131
-
132
-
133
-
134
-
135
-
136
-
137
-
138
-
139
-
 140
140 -
 141
141 -
 142
142 -
 143
143 -
 144
144 -
 145
145 -
 146
146 -
 147
147 -
 148
148 -
 149
149 -
 150
150 -
151
-
152
-
153
-
154
-
155
-
156
-
157
-
158
-
159
-
160
 |
 |
