Asus P5N64 WS PRO WIFI User Guide - Page 151
Creating a RAID Volume
 |
View all Asus P5N64 WS PRO WIFI manuals
Add to My Manuals
Save this manual to your list of manuals |
Page 151 highlights
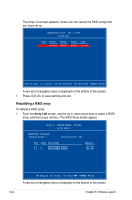
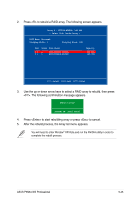
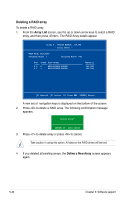
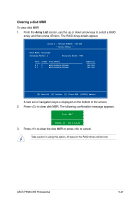
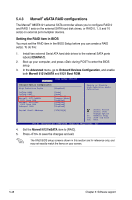
Creating a RAID Volume To create a RAID volume: 1. From the Define a New Array screen, use the key to highlight the RAID Mode field, and then press . The following sub-menu appears. Use the up or down arrow keys to select a RAID mode, and then press . Mirrored ↑ Striped Spanned Striped Mirror ↓ 2. Press to highlight the Stripe Block field, and then press . The following sub-menu appears: Use the up or down arrow keys to select the stripe size for your RAID array, and then press .The available values range from 8 KB to 128 KB. The default selection is Optimal. The strip value should be chosen based on the planned drive usage. 8K ↑ 16K 32K 64K 128K Optim↓ • 8 /16 KB - low disk usage • 64 KB - typical disk usage • 128 KB - performance disk usage • For server systems, we recommend using a lower array block size. For multimedia computer systems used mainly for audio and video editing, we recommend a higher array block size for optimum performance. • Stripe block size selection is not available for Mirrored or Spanned RAID arrays. 3. Press to highlight the Free Disks field. Use the left or right arrow keys to assign the array disks. 4. Press to create RAID set. The following message box appears. All data on new (or added) disks will be overwritten. Continue? [Y] YES [N] NO 5. Press to clear the selected disks or to proceed without clearing the disks. The following screen appears. Take caution in using this option. All data on the RAID drives will be lost! Clear MBR? [Y] YES [N] NO 6. Press to clear the MBR. ASUS P5N64 WS Professional 5-43
-
 1
1 -
2
-
3
-
4
-
5
-
6
-
7
-
8
-
9
-
10
-
11
-
12
-
13
-
14
-
15
-
16
-
17
-
18
-
19
-
20
-
21
-
22
-
23
-
24
-
25
-
26
-
27
-
28
-
29
-
30
-
31
-
32
-
33
-
34
-
35
-
36
-
37
-
38
-
39
-
40
-
41
-
42
-
43
-
44
-
45
-
46
-
47
-
48
-
49
-
50
-
51
-
52
-
53
-
54
-
55
-
56
-
57
-
58
-
59
-
60
-
61
-
62
-
63
-
64
-
65
-
66
-
67
-
68
-
69
-
70
-
71
-
72
-
73
-
74
-
75
-
76
-
77
-
78
-
79
-
80
-
81
-
82
-
83
-
84
-
85
-
86
-
87
-
88
-
89
-
90
-
91
-
92
-
93
-
94
-
95
-
96
-
97
-
98
-
99
-
100
-
101
-
102
-
103
-
104
-
105
-
106
-
107
-
108
-
109
-
110
-
111
-
112
-
113
-
114
-
115
-
116
-
117
-
118
-
119
-
120
-
121
-
122
-
123
-
124
-
125
-
126
-
127
-
128
-
129
-
130
-
131
-
132
-
133
-
134
-
135
-
136
-
137
-
138
-
139
-
140
-
141
-
142
-
143
-
144
-
145
-
 146
146 -
 147
147 -
 148
148 -
 149
149 -
 150
150 -
 151
151 -
 152
152 -
 153
153 -
 154
154 -
 155
155 -
 156
156 -
157
-
158
-
159
-
160
-
161
-
162
-
163
-
164
-
165
-
166
-
167
-
168
-
169
-
170
-
171
-
172
-
173
-
174
-
175
-
176
-
177
-
178
-
179
-
180
-
181
-
182
-
183
-
184
-
185
-
186
-
187
-
188
 |
 |
