Asus P5QL SE User Manual - Page 50
FSB Termination Voltage [Auto] - cpu
 |
View all Asus P5QL SE manuals
Add to My Manuals
Save this manual to your list of manuals |
Page 50 highlights
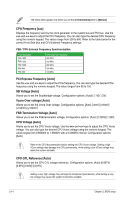
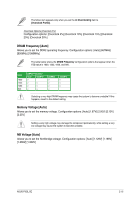
The follow items appear only when you set the Ai Overclocking item to [Manual]. CPU Frequency [xxx] Displays the frequency sent by the clock generator to the system bus and PCI bus. Use the and keys to adjust the CPU frequency. You can also type the desired CPU frequency using the numeric keypad. The values range from 200 to 600. Refer to the table below for the correct Front Side Bus and CPU External Frequency settings. FSB / CPU External Frequency Synchronization Front Side Bus FSB 1600 FSB 1333 FSB 1066 FSB 800 FSB 533 CPU External Frequency 400 MHz 333 MHz 266 MHz 200 MHz 133 MHz PCI Express Frequency [Auto] Use the and keys to adjust the PCIe frequency. You can also type the desired PCIe frequency using the numeric keypad. The value ranges from 90 to 150. SB Voltage [Auto] Allows you to set the Southbridge voltage. Configuration options: [Auto] [1.1V] [1.2V] Vcore Over voltage [Auto] Allows you to set the Vcore Over voltage. Configuration options: [Auto] [+0mV] [+50mV] [+100mV] [+150mV] FSB Termination Voltage [Auto] Allows you to set the FSB termination voltage. Configuration options: [Auto] [1.205V] [1.28V] CPU Voltage [Auto] Allows you to set the CPU Vcore voltage. Use the and keys to adjust the CPU Vcore voltage. You can also type the desired CPU Vcore voltage using the numeric keypad. The value ranges from 0.85000V to 1.55000V with a 0.00625V interval. Configuration options: [Auto] Refer to the CPU documentation before setting the CPU Vcore voltage. Setting a high VCore voltage may damage the CPU permanently, while setting a low VCore voltage may make the system unstable. CPU GTL Reference [Auto] Allows you to set the CPU GTL voltage reference. Configuration options: [Auto] [0.667V] [0.65V] [0.63V] [0.615V] Setting a very high voltage may damage the component permanently, while setting a very low voltage may cause the system to become unstable. 2-14 Chapter 2: BIOS setup
-
 1
1 -
2
-
3
-
4
-
5
-
6
-
7
-
8
-
9
-
10
-
11
-
12
-
13
-
14
-
15
-
16
-
17
-
18
-
19
-
20
-
21
-
22
-
23
-
24
-
25
-
26
-
27
-
28
-
29
-
30
-
31
-
32
-
33
-
34
-
35
-
36
-
37
-
38
-
39
-
40
-
41
-
42
-
43
-
44
-
 45
45 -
 46
46 -
 47
47 -
 48
48 -
 49
49 -
 50
50 -
 51
51 -
 52
52 -
 53
53 -
 54
54 -
 55
55 -
56
-
57
-
58
-
59
-
60
 |
 |