Asus P5QPL-VM EPU User Manual - Page 62
Tools menu
 |
View all Asus P5QPL-VM EPU manuals
Add to My Manuals
Save this manual to your list of manuals |
Page 62 highlights
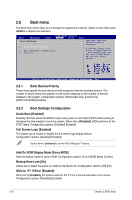
Change User Password Select this item to set or change the user password. The User Password item on top of the screen shows the default Not Installed. After you set a password, this item shows Installed. To set a User Password: 1. Select the Change User Password item and press . 2. On the password box that appears, type a password composed of up to six letters and/or numbers, then press . 3. Confirm the password when prompted. The message "Password Installed" appears after you set your password successfully. To change the user password, follow the same steps as in setting a user password. Clear User Password Select this item to clear the user password. Password Check [Setup] When set to [Setup], BIOS checks for user password when accessing the Setup utility. When set to [Always], BIOS checks for user password both when accessing Setup and booting the system. Configuration options: [Setup] [Always] 2.7 Tools menu The Tools menu items allow you to launch special functions. Select an item then press to display the submenu. Main Advanced BIOS SETUP UTILITY Power Boot Tools Exit ASUS EZ Flash 2 Express Gate Enter OS Timer Reset User Data AI NET 2 [Auto] [10 Seconds] [No] Press ENTER to run the utility to select and update BIOS. This utility supports 1.FAT 12/16/32 (r/w) 2.NTFS (read only) 3.CD-DISC (read only) SSeelleecctt SSccrreeeenn SSeelleecctt IItteemm E+n-ter GCohatnogeSuFbi-eslcdreen FE1nter GGeonetroalSuHbelSpcreen FF110 SGaevneeraanld HEexlipt EFS1C0 ESxaivte and Exit ESC Exit v02.61 (C)Copyright 1985-2009, American Megatrends, Inc. 2.7.1 ASUS EZ Flash 2 Allows you to run ASUS EZ Flash 2. When you press , a confirmation message appears. Use the left/right arrow key to select between [Yes] or [No], then press to confirm your choice. See section 2.1.2 ASUS EZ Flash 2 utility for details. 2-20 Chapter 2: BIOS setup
-
 1
1 -
2
-
3
-
4
-
5
-
6
-
7
-
8
-
9
-
10
-
11
-
12
-
13
-
14
-
15
-
16
-
17
-
18
-
19
-
20
-
21
-
22
-
23
-
24
-
25
-
26
-
27
-
28
-
29
-
30
-
31
-
32
-
33
-
34
-
35
-
36
-
37
-
38
-
39
-
40
-
41
-
42
-
43
-
44
-
45
-
46
-
47
-
48
-
49
-
50
-
51
-
52
-
53
-
54
-
55
-
56
-
 57
57 -
 58
58 -
 59
59 -
 60
60 -
 61
61 -
 62
62 -
 63
63 -
 64
64
 |
 |
