Asus P5V-VM DH P5VD2-MX/P5V-VM DH English Edition User''s Manual - Page 55
Updating the BIOS
 |
View all Asus P5V-VM DH manuals
Add to My Manuals
Save this manual to your list of manuals |
Page 55 highlights
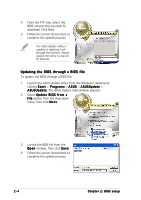
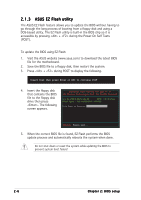
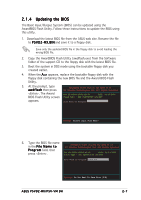
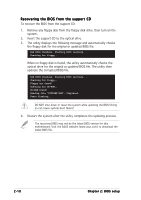
2.1.4 Updating the BIOS The Basic Input/Output System (BIOS) can be updated using the AwardBIOS Flash Utility. Follow these instructions to update the BIOS using this utility. 1. Download the latest BIOS file from the ASUS web site. Rename the file to P 5 V D 2 - M X . B I N and save it to a floppy disk. Save only the updated BIOS file in the floppy disk to avoid loading the wrong BIOS file. 2. Copy the AwardBIOS Flash Utility (awdflash.exe) from the Software folder of the support CD to the floppy disk with the latest BIOS file. 3. Boot the system in DOS mode using the bootable floppy disk you created earlier. 4. When the A : > appears, replace the bootable floppy disk with the floppy disk containing the new BIOS file and the Award BIOS Flash Utility. 5. At the prompt, type a w d f l a s h then press AwardBIOS Flash Utility for ASUS V1.14 (C) Phoenix Technologies Ltd. All Rights Reserved . The Award For NF-CK804-P5VD2-MX-00 DATE: 04/13/2006 BIOS Flash Utility screen Flash Type - PMC Pm49FL004T LPC/FWH appears. File Name to Program: Message: Please input File Name! 6. Type the BIOS file name in the F i l e N a m e t o P r o g r a m field, then press . AwardBIOS Flash Utility for ASUS V1.14 (C) Phoenix Technologies Ltd. All Rights Reserved For NF-CK804-P5VD2-MX-00 DATE: 04/13/2006 Flash Type - PMC Pm49FL004T LPC/FWH File Name to Program: 0104.bin Message: Do You Want To Save Bios (Y/N) ASUS P5VD2-MX/P5V-VM DH 2-7
-
 1
1 -
2
-
3
-
4
-
5
-
6
-
7
-
8
-
9
-
10
-
11
-
12
-
13
-
14
-
15
-
16
-
17
-
18
-
19
-
20
-
21
-
22
-
23
-
24
-
25
-
26
-
27
-
28
-
29
-
30
-
31
-
32
-
33
-
34
-
35
-
36
-
37
-
38
-
39
-
40
-
41
-
42
-
43
-
44
-
45
-
46
-
47
-
48
-
49
-
 50
50 -
 51
51 -
 52
52 -
 53
53 -
 54
54 -
 55
55 -
 56
56 -
 57
57 -
 58
58 -
 59
59 -
 60
60 -
61
-
62
-
63
-
64
-
65
-
66
-
67
-
68
-
69
-
70
-
71
-
72
-
73
-
74
-
75
-
76
-
77
-
78
-
79
-
80
-
81
-
82
-
83
-
84
-
85
-
86
-
87
-
88
-
89
-
90
-
91
-
92
-
93
-
94
-
95
-
96
-
97
-
98
-
99
-
100
-
101
-
102
-
103
-
104
-
105
-
106
-
107
-
108
 |
 |
