Asus P5VD2 MX Motherboard Installation Guide
Asus P5VD2 MX - SE Motherboard - Micro ATX Manual
 |
UPC - 610839154326
View all Asus P5VD2 MX manuals
Add to My Manuals
Save this manual to your list of manuals |
Asus P5VD2 MX manual content summary:
- Asus P5VD2 MX | Motherboard Installation Guide - Page 1
Motherboard P5VD2-MX/ P5V-VM DH - Asus P5VD2 MX | Motherboard Installation Guide - Page 2
T2505 © 2006 2 - Asus P5VD2 MX | Motherboard Installation Guide - Page 3
3 - Asus P5VD2 MX | Motherboard Installation Guide - Page 4
4 - Asus P5VD2 MX | Motherboard Installation Guide - Page 5
5 - Asus P5VD2 MX | Motherboard Installation Guide - Page 6
6 - Asus P5VD2 MX | Motherboard Installation Guide - Page 7
7 - Asus P5VD2 MX | Motherboard Installation Guide - Page 8
• • • 8 - Asus P5VD2 MX | Motherboard Installation Guide - Page 9
™ 12 Jumper Mode 23 Jumper Free (Default) 9 - Asus P5VD2 MX | Motherboard Installation Guide - Page 10
P5VD2-MX/P5V-VM DH-TAYZ 6 10839 11036 0 11XXX11XXX11 10 - Asus P5VD2 MX | Motherboard Installation Guide - Page 11
® ® ® ® 11 - Asus P5VD2 MX | Motherboard Installation Guide - Page 12
12 - Asus P5VD2 MX | Motherboard Installation Guide - Page 13
13 - Asus P5VD2 MX | Motherboard Installation Guide - Page 14
14 - Asus P5VD2 MX | Motherboard Installation Guide - Page 15
- Asus P5VD2 MX | Motherboard Installation Guide - Page 16
® 1-2 - Asus P5VD2 MX | Motherboard Installation Guide - Page 17
1-3 - Asus P5VD2 MX | Motherboard Installation Guide - Page 18
® 1-4 - Asus P5VD2 MX | Motherboard Installation Guide - Page 19
1-5 - Asus P5VD2 MX | Motherboard Installation Guide - Page 20
® Onboard LED SB_PWR ON Standby Power OFF Powered Off 1-6 - Asus P5VD2 MX | Motherboard Installation Guide - Page 21
® 1-7 - Asus P5VD2 MX | Motherboard Installation Guide - Page 22
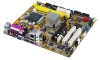
CPU_FAN ESATA PARALLEL PORT VGA USB12 ATX12V USBPW34 USBPW12 LAN_USB34 Top:Line In Center:Line Out Below:Mic In USB9 SATA_A WIFI VIA P4M890 ® JMicron JMB363 RTL8201CL CD AUX PCIEX16 PCIE1 CR2032 3V Lithium Cell CMOS Power PCI1 SPDIF_OUT CHA_FAN PCI2 AAFP MP3IN COM2 VIA VT8237A - Asus P5VD2 MX | Motherboard Installation Guide - Page 23
® • ® ® ® ® • • • ® CPU Socket 775 1-9 - Asus P5VD2 MX | Motherboard Installation Guide - Page 24
A B 1-10 - Asus P5VD2 MX | Motherboard Installation Guide - Page 25
A B ® ® ® ® ® 1-11 - Asus P5VD2 MX | Motherboard Installation Guide - Page 26
® ® • • ® ® ® • ® ® 1-12 - Asus P5VD2 MX | Motherboard Installation Guide - Page 27
A B B A B A A B ® CPU fan connector CPU_FAN GND CPU FAN PWR CPU FAN IN CPU FAN PWM 1-13 - Asus P5VD2 MX | Motherboard Installation Guide - Page 28
A B B A B A A B 1-14 - Asus P5VD2 MX | Motherboard Installation Guide - Page 29
1-15 - Asus P5VD2 MX | Motherboard Installation Guide - Page 30
DIMM1 DIMM2 ® 240-pin DDR2 DIMM sockets • • • 1-16 - Asus P5VD2 MX | Motherboard Installation Guide - Page 31
256MB KINGSTON E5116AB-5C-E N/A SS KVR533D2N4/256 VV 512MB KINGSTON HY5PS56821F-C4 N/A DS KVR533D2N4/512 VV 1024MB KINGSTON D6408TE7BL-37 N/A DS KVR533D2N4/1G VV 2048MB KINGSTON E1108AA-5C-E N/A DS KVR533D2N4/2G VV 512MB SAMSUNG K4T51083QB-GCD5 N/A SS M378T6553BG0-CD5 VV - Asus P5VD2 MX | Motherboard Installation Guide - Page 32
• • 1-18 2 1 1 2 1 1 - Asus P5VD2 MX | Motherboard Installation Guide - Page 33
1-19 - Asus P5VD2 MX | Motherboard Installation Guide - Page 34
A B CD 1-20 - Asus P5VD2 MX | Motherboard Installation Guide - Page 35
• • 1-21 - Asus P5VD2 MX | Motherboard Installation Guide - Page 36
® Clear RTC RAM CLRTC 12 23 Normal (Default) CLEAR 1-22 - Asus P5VD2 MX | Motherboard Installation Guide - Page 37
KBPWR 12 23 +5V (Default) +5VSB ® Keyboard power setting ® USB device wake-up USBPW34 USBPW12 3 2 2 1 +5V (Default) +5VSB USBPW56 1 2 USBPW782 3 +5V (Default) +5VSB 1-23 - Asus P5VD2 MX | Motherboard Installation Guide - Page 38
1-24 - Asus P5VD2 MX | Motherboard Installation Guide - Page 39
1 2 6 5 3 4 7 8 14 13 12 11 10 9 1-25 - Asus P5VD2 MX | Motherboard Installation Guide - Page 40
1-26 - Asus P5VD2 MX | Motherboard Installation Guide - Page 41
FLOPPY ® Floppy disk drive connector PIN 1 NOTE: Orient the red markings on the floppy ribbon cable to PIN 1. 1-27 - Asus P5VD2 MX | Motherboard Installation Guide - Page 42
• • ® IDE connectors NOTE: Orient the red markings (usually zigzag) on the IDE ribbon cable to PIN 1. PIN 1 PRI_IDE SEC_IDE 1-28 - Asus P5VD2 MX | Motherboard Installation Guide - Page 43
GND RSATA_TXP1 RSATA_TXN1 GND RSATA_RXP1 RSATA_RXN1 GND ® SATA connectors • • • SATA2 SATA1 ® SATA RAID connector SATA_A GND RSATA_TXP2 RSATA_TXN2 GND RSATA_RXP2 RSATA_RXN2 GND GND RSATA_TXP2 RSATA_TXN2 GND RSATA_RXP2 RSATA_RXN2 GND 1-29 - Asus P5VD2 MX | Motherboard Installation Guide - Page 44
® Fan connectors CPU_FAN GND CPU FAN PWR CPU FAN IN CPU FAN PWM CHA_FAN Rotation +12V GND GND SPDIFOUT +5V SPDIF_OUT ® Digital audio connector 1-30 - Asus P5VD2 MX | Motherboard Installation Guide - Page 45
• • • ATX12V EATXPWR GND +12V DC ® ATX power connectors GND +12V DC +3 Volts -12 Volts Ground PSON# Ground Ground Ground -5 Volts +5 Volts +5 Volts +5 Volts Ground +3 Volts +3 Volts Ground +5 Volts Ground +5 Volts Ground Power OK +5V Standby +12 Volts +12 Volts +3 Volts COM2 PIN 1 ® COM port - Asus P5VD2 MX | Motherboard Installation Guide - Page 46
® Internal audio connectors CD(Black) AUX(White) Right Audio Channel Ground Ground Left Audio Channel USB+5V USB_P8USB_P8+ GND NC USB+5V USB_P6USB_P6+ GND NC USB+5V USB_P7USB_P7+ GND ® USB 2.0 connectors USB56 1 USB78 1 USB+5V USB_P5USB_P5+ GND 1-32 - Asus P5VD2 MX | Motherboard Installation Guide - Page 47
1-33 Chassis intrusion connector (Default) +5VSB_MB Chassis Signal GND CHASSIS ® ® AAFP Analog front panel connector PORT1 L PORT1 R PORT2 R SENSE_SEND PORT2 L GND PRESENCE# SENSE1_RETUR SENSE2_RETUR MIC2_L MIC2_R Line out_R NC Line out_L AGND NC NC NC Legacy AC'97-compliant pin definition - Asus P5VD2 MX | Motherboard Installation Guide - Page 48
MP3IN Right Audio Channel Ground Ground Left Audio Channel ® MP3 connector • • 1-34 - Asus P5VD2 MX | Motherboard Installation Guide - Page 49
® System panel connector PLED SPEAKER PLED+ PLED+5V Ground Ground Speaker PANEL IDE_LED+ IDE_LED- PWR Ground Reset Ground IDE_LED RESET PWRSW * Requires an ATX power supply. • 1-35 - Asus P5VD2 MX | Motherboard Installation Guide - Page 50
1-36 - Asus P5VD2 MX | Motherboard Installation Guide - Page 51
2-1 - Asus P5VD2 MX | Motherboard Installation Guide - Page 52
2-2 - Asus P5VD2 MX | Motherboard Installation Guide - Page 53
2-3 - Asus P5VD2 MX | Motherboard Installation Guide - Page 54
2-4 - Asus P5VD2 MX | Motherboard Installation Guide - Page 55
2-5 - Asus P5VD2 MX | Motherboard Installation Guide - Page 56
Insert Disk then press Enter or ESC to continue POST 2-6 - Asus P5VD2 MX | Motherboard Installation Guide - Page 57
2-7 - Asus P5VD2 MX | Motherboard Installation Guide - Page 58
2-8 - Asus P5VD2 MX | Motherboard Installation Guide - Page 59
Bad BIOS checksum. Starting BIOS recovery... Checking for floppy... Bad BIOS checksum. Starting BIOS recovery... Checking for floppy... Floppy found! Reading file "P5VD2MX.ROM". Completed. Start flashing... 2-9 - Asus P5VD2 MX | Motherboard Installation Guide - Page 60
Bad BIOS checksum. Starting BIOS recovery... Checking for floppy... Bad BIOS checksum. Starting BIOS recovery... Checking for floppy... Floppy not found! Checking for CD-ROM... CD-ROM found! Reading file "P5VD2MX.ROM". Completed. Start flashing... 2-10 - Asus P5VD2 MX | Motherboard Installation Guide - Page 61
2-11 - Asus P5VD2 MX | Motherboard Installation Guide - Page 62
1 SATA 2 HDD SMART Monitoring Installed Memory Usable Memory 15:30:36 Mon, Mar 2 2006 [1.44M, 3.5 in.] [ST321122A] [ASUS CDS520/A] [None] [None] [None] [None] [Disabled] 512MB 512MB Select Menu Item Specific Help Change the day, month, year and country. F1:Help ESC:Exit :Select Item :Select Item - Asus P5VD2 MX | Motherboard Installation Guide - Page 63
2-13 - Asus P5VD2 MX | Motherboard Installation Guide - Page 64
[SDTi3s2k1e1t2t2eA]A: Primary IDE Slave [ASUS CDS520/A] Secondary IDE MasterDisabl[eNdone] .....[ ] Secondary IDE Slave 720K ,[N3o.n5e]in. .....[ ] SATA 1 1.44M,[N3o.n5e]in. .....[ ] SATA 2 [None] HDD SMART Monitoring [Disabled] Select Menu Item Specific Help Change the day, month - Asus P5VD2 MX | Motherboard Installation Guide - Page 65
1 SATA 2 HDD SMART Monitoring Installed Memory Usable Memory 15:30:36 Mon, Mar 2 2006 [1.44M, 3.5 in.] [ST321122A] [ASUS CDS520/A] [None] [None] [None] [None] [Disabled] 512MB 512MB Select Menu Item Specific Help Change the day, month, year and country. F1:Help ESC:Exit :Select Item :Select Item - Asus P5VD2 MX | Motherboard Installation Guide - Page 66
Main Phoenix-Award BIOS Setup Utility Primary IDE Master Select Menu Primary IDE Master Access Mode Capacity [Auto] [Auto] 82 GB Item Specific Help Press [Enter] to select Cylinder Head Sector PIO Mode UDMA Mode Transfer Mode 39420 16 255 [Auto] [Auto] UDMA 6 F1:Help ESC:Exit :Select - Asus P5VD2 MX | Motherboard Installation Guide - Page 67
2-17 - Asus P5VD2 MX | Motherboard Installation Guide - Page 68
Main Extended IDE Drive Access Mode Capacity Cylinder Head Landing Zone Sector Phoenix-Award BIOS Setup Utility SATA 1 [Auto] [Auto] 0 MB 0 0 0 0 Select Menu Item Specific Help Select the type of fixed disk connected to the system. F1:Help ESC:Exit :Select Item :Select Item -/+: Change Value - Asus P5VD2 MX | Motherboard Installation Guide - Page 69
2-19 - Asus P5VD2 MX | Motherboard Installation Guide - Page 70
Main Advanced Phoenix-Award BIOS Setup Utility Power Boot Exit CPU Configuration Chipset PCIPnP Onboard Device Configuration USB Configuration Select Menu Item Specific Help Press [Enter] to set. F1:Help ESC:Exit :Select Item :Select Item -/+: Change Value Enter:Select Submenu F5:Setup - Asus P5VD2 MX | Motherboard Installation Guide - Page 71
Advanced Phoenix-Award BIOS Setup Utility Chipset Select Menu DARM Clock/Drive Control Frequency/Voltage control Top Performance Primary Display Adapter VGA Share Memory Size [Disabled] [PCI-E] [64M] Item Specific Help Advanced Phoenix-Award BIOS Setup Utility DRAM Clock/Drive Control - Asus P5VD2 MX | Motherboard Installation Guide - Page 72
to CMD (Trcd) [4T] REF to ACT/REF(Trfc) [20T/21T] Act (0) to ACT (1) (TRRD) [3T] Advanced Phoenix-Award BIOS Setup Utility Frequency/Voltage control Select Menu CPU Frequency Ratio Async CPU/PCIE Clock CPU Clock Spread Spectrum [23 X] [Async Mode] [133MHz] [+/-0.2%] Item Specific Help 2-22 - Asus P5VD2 MX | Motherboard Installation Guide - Page 73
[No] Select Menu Item Specific Help Resources Controller By x IRQ Resources Assign IRQ For VGA ** PCI Express relative items ** Maximum Payload Size [Auto] [Enabled] [4096] Select Yes if you are using a Plug & Play capable operating system Select No if you need the BIOS to configure non-boot - Asus P5VD2 MX | Motherboard Installation Guide - Page 74
Advanced Phoenix-Award BIOS Setup Utility IRQ Resources Select Menu IRQ-3 assigned [PCI Device] [PCI Device] [PCI Device] [PCI Device] Item Specific Help Legacy ISA for devices compliant with the original PC AT bus specification, PCI/ISA PnP for devices compliant with the Plug and Play stanard - Asus P5VD2 MX | Motherboard Installation Guide - Page 75
Advanced Phoenix-Award BIOS Setup Utility Onboard Device Configuration Select Menu ] [Ex-SATA] [Auto] [Enabled] [Disabled] [3F8/IRQ4] [378/IRQ7] [Bi-Directional] [3] Item Specific Help Press [Enter] to set F1:Help ESC:Exit :Select Item :Select Item -/+: Change Value Enter:Select Submenu - Asus P5VD2 MX | Motherboard Installation Guide - Page 76
2-26 - Asus P5VD2 MX | Motherboard Installation Guide - Page 77
Advanced Phoenix-Award BIOS Setup Utility USB Configuration Select Menu USB Controller USB 2.0 Controller USB Legacy Support [Enabled] [Enabled] [Auto] Item Specific Help Enable or Disable USB 1.1 and 2.0 Controller 2-27 - Asus P5VD2 MX | Motherboard Installation Guide - Page 78
Advanced ACPI Suspend Type ACPI APIC support APM Configuration Hardware Monitor Phoenix-Award BIOS Setup Utility Power Boot Exit [S1&S3] Enabled Select Menu Item Specific Help Select the ACPI state used for System Suspend. Phoenix-Award BIOS Setup Utility Power AMP Configuration Select - Asus P5VD2 MX | Motherboard Installation Guide - Page 79
2-29 - Asus P5VD2 MX | Motherboard Installation Guide - Page 80
2-30 - Asus P5VD2 MX | Motherboard Installation Guide - Page 81
Award BIOS Setup Utility Power Hardware Minitor Select Menu Q-Fan Controller Vcore Voltage 3.3V Voltage 5V Voltage 12V Voltage [Enabled] [1.56V] [3.30V] [5.05V] [11.58V] Item Specific Help Press [Enter] to enable or disable CPU Temperature M/B Temperature CPU Fan Speed Chassis Fan Speed CPU Fan - Asus P5VD2 MX | Motherboard Installation Guide - Page 82
2-32 - Asus P5VD2 MX | Motherboard Installation Guide - Page 83
F5:Setup Default F10:Save and Exit Phoenix-Award BIOS Setup Utility Boot Boot Device Priority Select Menu 1st Boot Device 2nd Boot Device 3rd Boot Device 4th Boot Device [Removable] [Hard Disk] [CDROM] [Disabled] Item Specific Help Select Your Boot Device Priority 1. Floppy Disks Phoenix - Asus P5VD2 MX | Motherboard Installation Guide - Page 84
Select Menu 1. Bootable Add-in Cards Item Specific Help Phoenix-Award BIOS Setup Utility Boot Boot Setting Configuration Case Open [Disabled] 6 250 [Non-OS2] [Enabled] [All, But keyboard] Select Menu Item Specific Help Press [Enter] to enable or disable. F1:Help ESC:Exit :Select Item :Select - Asus P5VD2 MX | Motherboard Installation Guide - Page 85
2-35 - Asus P5VD2 MX | Motherboard Installation Guide - Page 86
Phoenix-Award BIOS Setup Utility Boot Boot Setting Configuration Select Menu SuperVisor Password User Password Password Check Clear Clear [Setup] Item Specific Help 2-36 - Asus P5VD2 MX | Motherboard Installation Guide - Page 87
2-37 - Asus P5VD2 MX | Motherboard Installation Guide - Page 88
Main Advanced Phoenix-Award BIOS Setup Utility Power Boot Exit Exit & Save Changes Exit & Discard Changes Load Setup Default Discard Changes Select Menu Item Specific Help This option save data to CMOS and exiting the setup menu. F1:Help ESC:Exit :Select Item :Select Item -/+: Change Value - Asus P5VD2 MX | Motherboard Installation Guide - Page 89
2-39 - Asus P5VD2 MX | Motherboard Installation Guide - Page 90
2-40 - Asus P5VD2 MX | Motherboard Installation Guide - Page 91
- Asus P5VD2 MX | Motherboard Installation Guide - Page 92
3-2 - Asus P5VD2 MX | Motherboard Installation Guide - Page 93
3-3 - Asus P5VD2 MX | Motherboard Installation Guide - Page 94
3-4 - Asus P5VD2 MX | Motherboard Installation Guide - Page 95
3-5 - Asus P5VD2 MX | Motherboard Installation Guide - Page 96
3-6 - Asus P5VD2 MX | Motherboard Installation Guide - Page 97
3-7 - Asus P5VD2 MX | Motherboard Installation Guide - Page 98
3-8 - Asus P5VD2 MX | Motherboard Installation Guide - Page 99
VIA Tech. RAID BIOS Ver 1.xx Auto Setup For Data Security Array Mode RAID 1 (Mirroring) Select Disk Drives Start Create Process Create a RAID array with the hard disks attached - Asus P5VD2 MX | Motherboard Installation Guide - Page 100
4K 8K 16K 32K 64K The data on the selected disks will be destroyed. Continue? (Y/N) RAID 0 for performance RAID 1 for Data Protection RAID 0/1 RAID SPAN for capacity 3-10 - Asus P5VD2 MX | Motherboard Installation Guide - Page 101
Auto create array will destroy all data on disks, Continue? (Y/N) Save the data on source disk to mirror after creation? (Y/N) Duplicating..... RAID 1 for data protection Press Yes(Y) to Escape The data on the selected disks will be destroyed. Continue? (Y/N) 3-11 - Asus P5VD2 MX | Motherboard Installation Guide - Page 102
Advanced Phoenix-Award BIOS Setup Utility Onboard Device Configuration Select Menu ] [Ex-SATA] [Auto] [Enabled] [Disabled] [3F8/IRQ4] [378/IRQ7] [Bi-Directional] [3] Item Specific Help Press [Enter] to set F1:Help ESC:Exit :Select Item :Select Item -/+: Change Value Enter:Select Submenu - Asus P5VD2 MX | Motherboard Installation Guide - Page 103
Corp. PCI-to-SATA II/IDE RAID Controller BIOS v0.97 [Main Menu] [Hard Disk Drive List] Create RAID Disk Drive Delete RAID Disk Drive Revert RAID Save and Exit Setup Exit Without Saving [Raid Disk Drive List] [ TAB]-Switch Windows [↑↓]-Select Item [Enter]-Action [ESC]-Exit [Main Menu] - Asus P5VD2 MX | Motherboard Installation Guide - Page 104
GB Confirm Creation [Create New RAID] Name Level Disks Block Size : JRAID : 1-Mirror : Select Disk : N/A : 159 GB Confirm Creation [Raid Disk Drive List] Model Name HDD0: HDS722516VLSA80 HDD1: HDS722516DLA380 Capacity xxx GB xxx GB Type/Status Non-RAID Non-RAID [Create New RAID] Name Level - Asus P5VD2 MX | Motherboard Installation Guide - Page 105
. PCI-to-SATA II/IDE RAID Controller BIOS v0.97 [Main Menu] [Hard Disk Drive List] Create RAID Disk Drive Delete RAID Disk Drive ] the selected HDD (Y/N)? Y [ TAB]-Switch Windows [↑↓]-Select Item [Enter]-Action [ESC]-Exit [Raid Disk Drive List] Model Name RAID Level RDD0: JRAID 0-Stripe - Asus P5VD2 MX | Motherboard Installation Guide - Page 106
Without Saving JMicron Technology Corp. PCI-to-SATA II/IDE RAID Controller BIOS v0.97 [Main Menu] [Hard Disk Drive List] Create RAID Disk Drive Delete RAID Disk Drive Revert HDD to Non LOST!! ARE YOU SURE TO DELETE (Y/N)? Y [ TAB]-Switch Windows [↑↓]-Select Item [Enter]-Action [ESC]-Exit 3-16 - Asus P5VD2 MX | Motherboard Installation Guide - Page 107
[Main Menu] Create RAID Disk Drive Delete RAID Disk Drive Revert HDD to Non-RAID Repair Mirror Conflict Save and Exit Setup Exit Without Saving 3-17 - Asus P5VD2 MX | Motherboard Installation Guide - Page 108
Repair Mirror Conflict Save and Exit Setup Exit Without Saving JMicron Technology Corp. PCI-to-SATA II/IDE RAID Controller BIOS v0.97 [Main Menu] [Hard Disk Drive List] Create RAID Disk Drive Delete RAID Disk Drive Revert HDD to Non-RAID Repair Mirror Conflict Model Name Capacity Type/Status - Asus P5VD2 MX | Motherboard Installation Guide - Page 109
3-19 - Asus P5VD2 MX | Motherboard Installation Guide - Page 110
3-20 - Asus P5VD2 MX | Motherboard Installation Guide - Page 111
3-21 - Asus P5VD2 MX | Motherboard Installation Guide - Page 112
3-22
-
 1
1 -
 2
2 -
 3
3 -
 4
4 -
 5
5 -
 6
6 -
 7
7 -
8
-
9
-
10
-
11
-
12
-
13
-
14
-
15
-
16
-
17
-
18
-
19
-
20
-
21
-
22
-
23
-
24
-
25
-
26
-
27
-
28
-
29
-
30
-
31
-
32
-
33
-
34
-
35
-
36
-
37
-
38
-
39
-
40
-
41
-
42
-
43
-
44
-
45
-
46
-
47
-
48
-
49
-
50
-
51
-
52
-
53
-
54
-
55
-
56
-
57
-
58
-
59
-
60
-
61
-
62
-
63
-
64
-
65
-
66
-
67
-
68
-
69
-
70
-
71
-
72
-
73
-
74
-
75
-
76
-
77
-
78
-
79
-
80
-
81
-
82
-
83
-
84
-
85
-
86
-
87
-
88
-
89
-
90
-
91
-
92
-
93
-
94
-
95
-
96
-
97
-
98
-
99
-
100
-
101
-
102
-
103
-
104
-
105
-
106
-
107
-
108
-
109
-
110
-
111
-
112
 |
 |
Motherboard
P5VD2-MX/
P5V-VM DH