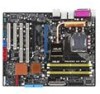
Asus P5WDG2 WS Professional Motherboard Installation Guide - Page 164
Creating a RAID driver disk
 |
View all Asus P5WDG2 WS Professional manuals
Add to My Manuals
Save this manual to your list of manuals |
Page 164 highlights
5.5 Creating a RAID driver disk A floppy disk with the RAID driver is required when installing Windows® 2000/XP operating system on a hard disk drive that is included in a RAID set. You can create a RAID driver disk in DOS (using the Makedisk application in the support CD) or in Windows® environment. To create a RAID driver disk in DOS environment: 1. Place the motherboard support CD in the optical drive. 2. Restart the computer, then enter the BIOS Setup. 3. Select the optical drive as the first boot priority to boot from the support CD. Save your changes, then exit the BIOS Setup. 4. Restart the computer. 5. Press any key when prompted to boot from CD. Loading FreeDOS FAT KERNEL GO! Press any key to boot from CDROM... The Makedisk menu appears. 1) Make ICH7R 32-bit RAID driver disk 2) Make ICH7R 64-bit RAID driver disk 3) Make Marvell 88SE6140 SATA2 RAID driver disk 4) Format floppy disk 5) FreeDOS command prompt Please choose 1 ~ 6 6. Place a blank, high-density floppy disk to the floppy disk drive, then press the corresponding number to format the floppy disk. The following message displays on screen. Insert new diskette for drive B:\ and press ENTER when ready... 7. Press to format the floppy disk. 8. When finished, select the type of RAID driver disk you want to create by typing the number preceding the option, then press . The following message appears on screen. Please insert your formatted floppy to drive B:\ Press a key to continue. The screens shown in this section are for reference only, and may not exactly match the items on your screen. 5-40 Chapter 5: Software support
-
 1
1 -
2
-
3
-
4
-
5
-
6
-
7
-
8
-
9
-
10
-
11
-
12
-
13
-
14
-
15
-
16
-
17
-
18
-
19
-
20
-
21
-
22
-
23
-
24
-
25
-
26
-
27
-
28
-
29
-
30
-
31
-
32
-
33
-
34
-
35
-
36
-
37
-
38
-
39
-
40
-
41
-
42
-
43
-
44
-
45
-
46
-
47
-
48
-
49
-
50
-
51
-
52
-
53
-
54
-
55
-
56
-
57
-
58
-
59
-
60
-
61
-
62
-
63
-
64
-
65
-
66
-
67
-
68
-
69
-
70
-
71
-
72
-
73
-
74
-
75
-
76
-
77
-
78
-
79
-
80
-
81
-
82
-
83
-
84
-
85
-
86
-
87
-
88
-
89
-
90
-
91
-
92
-
93
-
94
-
95
-
96
-
97
-
98
-
99
-
100
-
101
-
102
-
103
-
104
-
105
-
106
-
107
-
108
-
109
-
110
-
111
-
112
-
113
-
114
-
115
-
116
-
117
-
118
-
119
-
120
-
121
-
122
-
123
-
124
-
125
-
126
-
127
-
128
-
129
-
130
-
131
-
132
-
133
-
134
-
135
-
136
-
137
-
138
-
139
-
140
-
141
-
142
-
143
-
144
-
145
-
146
-
147
-
148
-
149
-
150
-
151
-
152
-
153
-
154
-
155
-
156
-
157
-
158
-
 159
159 -
 160
160 -
 161
161 -
 162
162 -
 163
163 -
 164
164 -
 165
165 -
 166
166 -
 167
167 -
 168
168 -
 169
169 -
170
-
171
-
172
 |
 |
