Asus PRIME Z590-P WIFI RAID Configuration Guide English - Page 23
Array Management, Create, Array, Select, RAID Level, Physical Disks, Apply Changes, item is selected
 |
View all Asus PRIME Z590-P WIFI manuals
Add to My Manuals
Save this manual to your list of manuals |
Page 23 highlights
Creating a RAID set To create a RAID set: 1. From the RaidXpert2 Configuration Utility menu, go to Array Management > Create Array to enter the Create Array menu. The following screen appears: 2. When the Select RAID Level item is selected, press to select the RAID level to create, and then press . 3. When the Select Physical Disks item is selected, press to enter the Select Physical Disks menu. The following screen appears: 4. Toggle the physical disks that you want to include in the RAID set to On, then select Apply Changes and press to complete selection. RAID Configuration Guide 2-3
-
 1
1 -
2
-
3
-
4
-
5
-
6
-
7
-
8
-
9
-
10
-
11
-
12
-
13
-
14
-
15
-
16
-
17
-
 18
18 -
 19
19 -
 20
20 -
 21
21 -
 22
22 -
 23
23 -
 24
24 -
 25
25 -
 26
26 -
 27
27 -
 28
28
 |
 |

RAID Configuration Guide
2-3
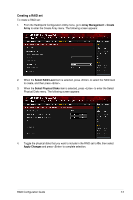
Creating a RAID set
To create a RAID set:
1.
From the RaidXpert2 Configuration Utility menu, go to
Array Management
>
Create
Array
to enter the Create Array menu. The following screen appears:
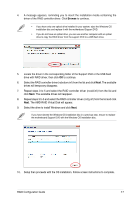
2.
When the
Select
RAID Level
item is selected, press <Enter> to select the RAID level
to create, and then press <Enter>.
3.
When the
Select
Physical Disks
item is selected, press <Enter> to enter the Select
Physical Disks menu. The following screen appears:
4.
Toggle the physical disks that you want to include in the RAID set to
On
, then select
Apply Changes
and press <Enter> to complete selection.