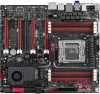
Asus RAMPAGE IV EXTREME User Manual - Page 84
ROG Connect - oc panel
 |
View all Asus RAMPAGE IV EXTREME manuals
Add to My Manuals
Save this manual to your list of manuals |
Page 84 highlights
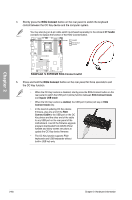
Chapter 2 4. Shortly press the ROG Connect button on the rear panel to switch the keyboard control between the OC Key device and the computer system. You may also plug an 2-pin cable switch (purchased separately) to the onboard OT header connector to replace the function of the ROG Connect button. 5. Press and hold the ROG Connect button on the rear panel for three seconds to exit the OC Key function. • When the OC Key function is disabled, shortly press the ROG Connect button on the rear panel to switch the USB port 6 (white) function between ROG Connect mode and regular USB mode. • When the OC Key function is enabled, the USB port 6 (white) will stay in ROG Connect mode only. • In the need of updating OC Key device firmware, plug one end of the ROG Connect Cable to the USB port on the OC Key device and the other end of the cable to any USB port on the rear panel of the motherboard. Launch the firmware upgrade program downloaded from ASUS official website and follow screen intructions to update the OC Key device firmware. • The OC Key function supports PS/2 keyboards and USB keyboards without built-in USB hub only. 2-60 Chapter 2: Hardware information
-
 1
1 -
2
-
3
-
4
-
5
-
6
-
7
-
8
-
9
-
10
-
11
-
12
-
13
-
14
-
15
-
16
-
17
-
18
-
19
-
20
-
21
-
22
-
23
-
24
-
25
-
26
-
27
-
28
-
29
-
30
-
31
-
32
-
33
-
34
-
35
-
36
-
37
-
38
-
39
-
40
-
41
-
42
-
43
-
44
-
45
-
46
-
47
-
48
-
49
-
50
-
51
-
52
-
53
-
54
-
55
-
56
-
57
-
58
-
59
-
60
-
61
-
62
-
63
-
64
-
65
-
66
-
67
-
68
-
69
-
70
-
71
-
72
-
73
-
74
-
75
-
76
-
77
-
78
-
 79
79 -
 80
80 -
 81
81 -
 82
82 -
 83
83 -
 84
84 -
 85
85 -
 86
86 -
 87
87 -
 88
88 -
 89
89 -
90
-
91
-
92
-
93
-
94
-
95
-
96
-
97
-
98
-
99
-
100
-
101
-
102
-
103
-
104
-
105
-
106
-
107
-
108
-
109
-
110
-
111
-
112
-
113
-
114
-
115
-
116
-
117
-
118
-
119
-
120
-
121
-
122
-
123
-
124
-
125
-
126
-
127
-
128
-
129
-
130
-
131
-
132
-
133
-
134
-
135
-
136
-
137
-
138
-
139
-
140
-
141
-
142
-
143
-
144
-
145
-
146
-
147
-
148
-
149
-
150
-
151
-
152
-
153
-
154
-
155
-
156
-
157
-
158
-
159
-
160
-
161
-
162
-
163
-
164
-
165
-
166
-
167
-
168
-
169
-
170
-
171
-
172
-
173
-
174
-
175
-
176
-
177
-
178
-
179
 |
 |
