Asus ROG Gladius II ROG Gladius II Quick Start Guide for Multiple Languages - Page 4
Getting started, Replacing the switches - mouse
 |
View all Asus ROG Gladius II manuals
Add to My Manuals
Save this manual to your list of manuals |
Page 4 highlights
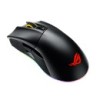
Getting started To set up your ROG Gladius II Gaming Mouse: 1. Connect the USB cable to your computer's USB port. 2. Connect the micro USB cable to your ROG Gladius II Gaming Mouse. NOTE: Ensure the ROG logo on the micro USB cable faces up when connecting it to the ROG Gladius II Gaming mouse. 3. Download the driver from http://www.asus.com then install it in your computer. Replacing the switches NOTE: Refer to www.asus.com for the list of compatible switches. If you want to replace the switches, follow the steps below: 1. Remove the four (4) rubber covers under your mouse, then remove the four (4) screws and set them aside. 2. Remove the top cover. 3. Replace the switches. Mouse switches Switch socket Switch socket IMPORTANT! • Ensure to install the switch with its button facing the front of the mouse to the switch socket. • Ensure that the switches are seated properly on the switch sockets. 4. Replace the cover and secure with the screws. 5. Replace the rubber covers on the bottom of your mouse. English 4 Quick Start Guide
-
 1
1 -
 2
2 -
 3
3 -
 4
4 -
 5
5 -
 6
6 -
 7
7 -
 8
8 -
 9
9 -
 10
10 -
11
-
12
-
13
-
14
-
15
-
16
-
17
-
18
-
19
-
20
-
21
-
22
-
23
-
24
-
25
-
26
-
27
-
28
-
29
-
30
-
31
-
32
-
33
-
34
-
35
-
36
-
37
-
38
-
39
-
40
-
41
-
42
-
43
-
44
-
45
-
46
-
47
-
48
-
49
-
50
-
51
-
52
-
53
-
54
-
55
 |
 |
