Asus ROG STRIX Z270H GAMING STRIX Z270H GAMING Users ManualEnglish - Page 48
D printing part installation, Installing the 3D printing part onto the 3D Mount
 |
View all Asus ROG STRIX Z270H GAMING manuals
Add to My Manuals
Save this manual to your list of manuals |
Page 48 highlights
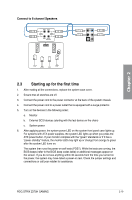
2.1.10 3D printing part installation Installing the 3D printing part onto the 3D Mount A 3D printing part may be installed onto your motherboard into the 3D Mount shown in the illustration below. For more details regarding the installation of the 3D printing part on your motherboard, please refer to the product page of your motherboard on the ASUS website at www.asus.com. Secure the cable cover 3D printing part using the 3D Printing Mount A and 3D Printing Mount C. Chapter 2 2-14 Chapter 2: Basic Installation
-
 1
1 -
2
-
3
-
4
-
5
-
6
-
7
-
8
-
9
-
10
-
11
-
12
-
13
-
14
-
15
-
16
-
17
-
18
-
19
-
20
-
21
-
22
-
23
-
24
-
25
-
26
-
27
-
28
-
29
-
30
-
31
-
32
-
33
-
34
-
35
-
36
-
37
-
38
-
39
-
40
-
41
-
42
-
 43
43 -
 44
44 -
 45
45 -
 46
46 -
 47
47 -
 48
48 -
 49
49 -
 50
50 -
 51
51 -
 52
52 -
 53
53 -
54
-
55
-
56
-
57
-
58
-
59
-
60
-
61
-
62
-
63
-
64
-
65
-
66
-
67
-
68
-
69
-
70
-
71
-
72
-
73
-
74
-
75
-
76
-
77
-
78
-
79
-
80
-
81
-
82
-
83
-
84
-
85
-
86
-
87
-
88
-
89
-
90
-
91
-
92
-
93
-
94
-
95
-
96
-
97
-
98
 |
 |

2-14
Chapter 2: Basic Installation
Chapter 2
2.1.10
3D printing part installation
Installing the 3D printing part onto the 3D Mount
A 3D printing part may be installed onto your motherboard into the 3D Mount shown in the
illustration below.
For more details regarding the installation of the 3D printing part on your motherboard, please
refer to the product page of your motherboard on the ASUS website at www.asus.com.
Secure the cable cover 3D printing part using the 3D Printing Mount A and 3D Printing
Mount C.