Asus ROG Strix GL12 GL12CP series users manual - Page 15
Installing a swappable Solid State Drive (SSD)/ Hard Disk Drive (HDD), To install a swappable SSD
 |
View all Asus ROG Strix GL12 manuals
Add to My Manuals
Save this manual to your list of manuals |
Page 15 highlights
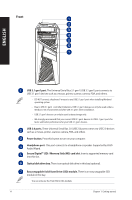
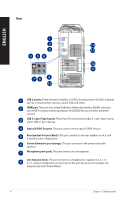
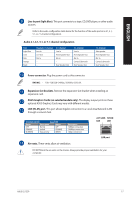
ENGLISH Installing a swappable Solid State Drive (SSD) To install a swappable SSD 1. Place the SSD on the SSD module tray with the label side facing up and the connectors facing the end of the tray. 2. Mount and secure the SSD to the tray with the screws that came along with your product. 3. Push the tray gently into the SSD bay. 4. Select a program from the AutoPlay window to access your files. You can only use the 7mm SSD in this module. ASUS GL12CP 15
-
 1
1 -
2
-
3
-
4
-
5
-
6
-
7
-
8
-
9
-
 10
10 -
 11
11 -
 12
12 -
 13
13 -
 14
14 -
 15
15 -
 16
16 -
 17
17 -
 18
18 -
 19
19 -
 20
20 -
21
-
22
-
23
-
24
-
25
-
26
-
27
-
28
-
29
-
30
-
31
-
32
-
33
-
34
-
35
-
36
-
37
-
38
-
39
-
40
-
41
-
42
-
43
-
44
-
45
-
46
-
47
-
48
-
49
-
50
-
51
-
52
 |
 |

Installing a swappable Solid State Drive (SSD)
To install a swappable SSD
1.
Place the SSD on the SSD module tray with the label side facing up and the connectors
facing the end of the tray.
2.
Mount and secure the SSD to the tray with the screws that came along with your product.
3.
Push the tray gently into the SSD bay.
4.
Select a program from the AutoPlay window to access your files.
You can only use the 7mm SSD in this module.
ASUS GL12CP
15
ENGLISH