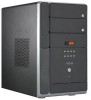
Asus T2-PH2 T2-PH2 User''s Manual for English Edition - Page 37
Installing an optical drive
 |
View all Asus T2-PH2 manuals
Add to My Manuals
Save this manual to your list of manuals |
Page 37 highlights
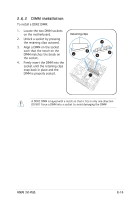
2.8 Installing an optical drive The barebone system comes with two 5.25-inch drive bays for two optical drives. • You may install a second optical drive only if you installed a Serial ATA hard disk drive. • Set your second optical drive as Slave device before connecting the IDE cable and power plug. Refer to the optical drive documentation on how to set the drive as a Slave device. To install an optical drive: 1. Place the chassis upright. 2. Locate the front panel cover hooks. 3. To remove the front panel cover from the chassis, press the top hooks downward and the bottom hooks upward to release them from the metal tabs that secure them in place. 4. Detach the front panel cover top hooks. 3 3 1 2 3 3 4 4 5. Slightly push the front panel cover outward until it detaches from the chassis, then set it aside. On Deluxe models, disconnect the LED panel and the front 5 audio button panel cables from their respective connectors before removing the front panel cover. To reconnect the cables, see pages 4-12 for the location of the connectors. ASUS T2-PH2 2-17
-
 1
1 -
2
-
3
-
4
-
5
-
6
-
7
-
8
-
9
-
10
-
11
-
12
-
13
-
14
-
15
-
16
-
17
-
18
-
19
-
20
-
21
-
22
-
23
-
24
-
25
-
26
-
27
-
28
-
29
-
30
-
31
-
 32
32 -
 33
33 -
 34
34 -
 35
35 -
 36
36 -
 37
37 -
 38
38 -
 39
39 -
 40
40 -
 41
41 -
 42
42 -
43
-
44
-
45
-
46
-
47
-
48
-
49
-
50
-
51
-
52
-
53
-
54
-
55
-
56
-
57
-
58
-
59
-
60
-
61
-
62
-
63
-
64
-
65
-
66
-
67
-
68
-
69
-
70
-
71
-
72
-
73
-
74
-
75
-
76
-
77
-
78
-
79
-
80
-
81
-
82
-
83
-
84
-
85
-
86
-
87
-
88
-
89
-
90
-
91
-
92
-
93
-
94
-
95
-
96
-
97
-
98
-
99
-
100
-
101
-
102
-
103
-
104
-
105
-
106
-
107
-
108
-
109
-
110
-
111
-
112
-
113
-
114
 |
 |
