Asus TS-Mini/500GB Setup Guide - Page 1
Asus TS-Mini/500GB - TS Mini SOHO Server Manual
 |
UPC - 610839079094
View all Asus TS-Mini/500GB manuals
Add to My Manuals
Save this manual to your list of manuals |
Page 1 highlights
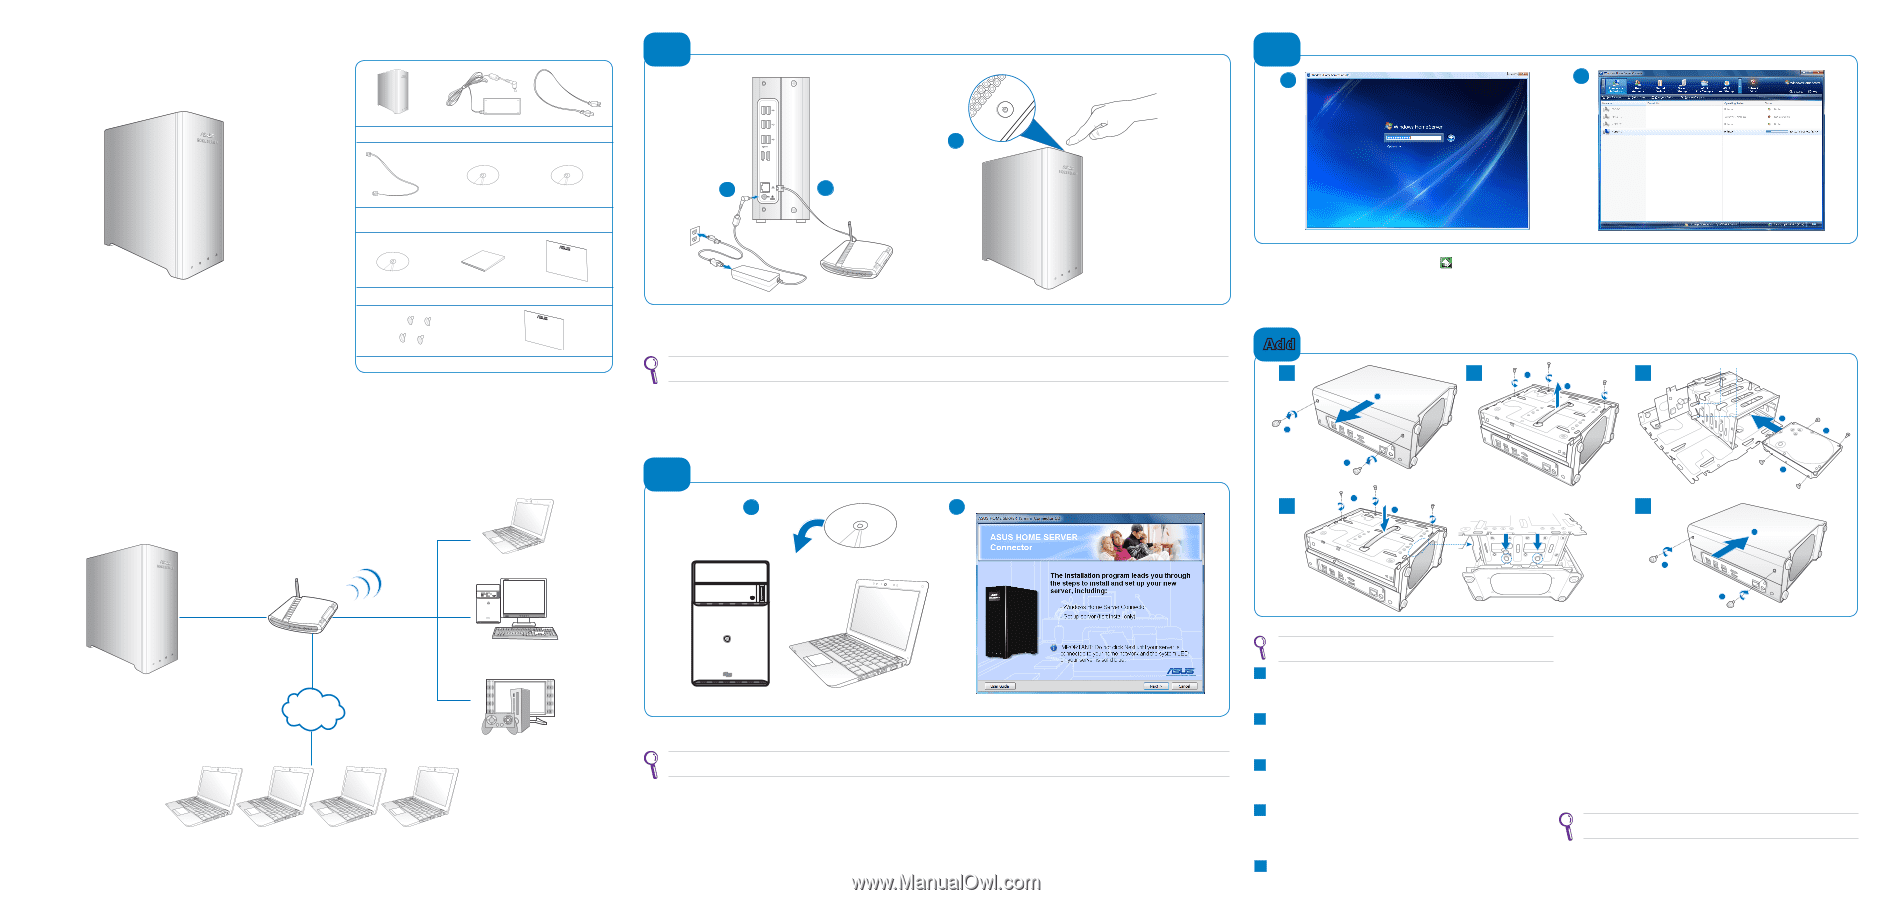
E5046 Home Server TS mini Package contents 1 Setting up your TS mini 3 Getting started 1 2 TS mini AC adapter Power cord Quick Start Guide 15G065278000 Home network scenario RJ45 LAN cable Software Installation CD Recovery DVD User Manual Quick Start Guide Restore CD User manual Quick Start Guide Warranty Card HDD screws package Warranty card Internet HOME SERVER TS mini SPLENDID MENU Router Internet Notebook PCs SPLENDID MENU Desktop PCs HDD Multimedia Devices Remote Access SPLENDID MENU HDD E-SATA 1 2 3 Internet 1. Connect the supplied power cord to the supplied AC adapter. Then, plug the AC adapter to the DC IN jack on the TS mini rear panel and the power cord to an electrical outlet. 2. Connect one end of a network cable to the LAN port on the server rear panel, and the other end to your broadband router. You must use a network cable to connect the TS mini to your broadband router. Wireless connection to your broadband router is not supported. However, after you connect your server to your home network, home computers can connect to your server through wireless connection. 3. Press the power switch on the top panel to turn on the TS mini. 2 1 2 Installing the Software on Your First Computer1 1 1 2 2 2 1 1 1 2 2 1 2 1. Double-click the W1indows Home Server icon to bring up the logon1 window, and then enter the administrator password to log on to the Windows Home Server Console. 2 2 1 1 2. On the Windows Home Server Console interface, you can start to remotely view, add, share, and protect important files on your home server.Turn over this Quick Start Guide to see what you 1 can do with th1e Windows Home Server Console. 2 1 2 1 Adding a hard disk drive 1 1 22 2 1 2 1 HDD2 HDD1 3 2 1 2 11 11 21 4 12 1 2 1 1 2 1 1 2 1 2 51 2 11 2 1 1 1 2 HDD 2 1 1 1 SPLENDID MENU 2 1 1 1. Insert the Software Installation CD into the computer that is connected to your home network.The Windows Home Server Connector wizard starts. If Autorun is NOT enabled in your computer, browse the contents of the Software Installation CD to locate the Install.exe file. Double-click the Install.exe to run the Connector wizard. 2. Click Next, and then follow the onscreen instructions to finish the installation and the Windows Home Server Setup.You will be required to set the server name, administrator password, and several settings. 1. Install the new HDD to the home server. 1 2. Add the new hard drive to Server Storag2e on the Windows Home Always install the1hard disk drive in which the OS is or will be inst2alled to the HDD1 bay. Server Console. 1 1 (a) Log on to the Windows Home Server Console. 1 (a) Power off the server and unplug the power cord. 2 (b) Lay the server horizontally on a stable surface, a2nd then loosen the two thumbscrews to remove the left side case. 1 (b) Click the Server Storage tab. 2 (c) Select the newly added hard drive (either internal or external) and then click Add to bring up the Add a Hard Drive Wizard. Click Next. 2 (c) Use a coin to loosen the three screws and put the screws at a visible place in case they are lost. 1 (d) Hold the plastic grip, and then lift up the HDD cage horizontally. (d) Select from the following options: • Add this hard drive to your server storage to increase the storage capacity of your home server. 3 (e) Reverse and place the HDD cage on the stable surface. (f ) Fasten the bundled four screws to the new HDD, and then slide the HDD into the empty HDD bay. 4 (g) Hold the plastic grip and align the two pins on the cage as shown to the mounting holes. Push down the HDD cage to the right side case. (h) Fasten the three screws which were removed and put aside at the beginning. 5 (i) Slide the left side case back to the server body, and then fasten the two thumbscrews back to the case. • Use this hard drive to back up files that are stored on your home server. 1 (e) For detailed instructions, refer to the Windows Home Server Console 2 Help. 2 Ensure tha1t the newly installed hard drive must have 36GB capacity at least or else the HOME SERVER cannot recognize the hard drive. 1
-
 1
1 -
 2
2
 |
 |