Asus TS100-E7 PI4 User Guide - Page 33
Follow the instructions on the previous to reinstall the front panel
 |
View all Asus TS100-E7 PI4 manuals
Add to My Manuals
Save this manual to your list of manuals |
Page 33 highlights
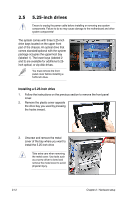
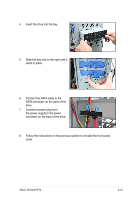
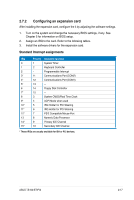
4. Insert the drive into the bay. 5. Slide the bay lock to the right until it clicks in place. 6. Connect the SATA cable to the SATA connector on the back of the drive. 7. Connect a power plug from the power supply to the power connector on the back of the drive. 76 8. Follow the instructions on the previous section to reinstall the front panel cover. ASUS TS100-E7/PI4 2-13
-
 1
1 -
2
-
3
-
4
-
5
-
6
-
7
-
8
-
9
-
10
-
11
-
12
-
13
-
14
-
15
-
16
-
17
-
18
-
19
-
20
-
21
-
22
-
23
-
24
-
25
-
26
-
27
-
 28
28 -
 29
29 -
 30
30 -
 31
31 -
 32
32 -
 33
33 -
 34
34 -
 35
35 -
 36
36 -
 37
37 -
 38
38 -
39
-
40
-
41
-
42
-
43
-
44
-
45
-
46
-
47
-
48
-
49
-
50
-
51
-
52
-
53
-
54
-
55
-
56
-
57
-
58
-
59
-
60
-
61
-
62
-
63
-
64
-
65
-
66
-
67
-
68
-
69
-
70
-
71
-
72
-
73
-
74
-
75
-
76
-
77
-
78
-
79
-
80
-
81
-
82
-
83
-
84
-
85
-
86
-
87
-
88
-
89
-
90
-
91
-
92
-
93
-
94
-
95
-
96
-
97
-
98
-
99
-
100
-
101
-
102
-
103
-
104
-
105
-
106
-
107
-
108
-
109
-
110
-
111
-
112
-
113
-
114
-
115
-
116
-
117
-
118
-
119
-
120
-
121
-
122
-
123
-
124
-
125
-
126
-
127
-
128
-
129
-
130
-
131
-
132
-
133
-
134
 |
 |

2-13
ASUS TS100-E7/PI4
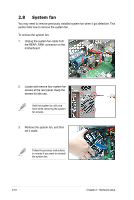
6.
Connect the SATA cable to the
SATA connector on the back of the
drive.
7.
Connect a power plug from
the power supply to the power
connector on the back of the drive.
8.
Follow the instructions on the previous section to reinstall the front panel
cover.
4.
Insert the drive into the bay.
5.
Slide the bay lock to the right until it
clicks in place.
7
6