Asus VH197T User Guide - Page 10
VW197N/VW197D
 |
View all Asus VH197T manuals
Add to My Manuals
Save this manual to your list of manuals |
Page 10 highlights
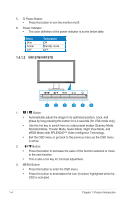
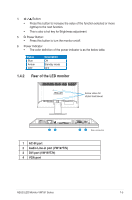
5. Power Button: • Press this button to turn the monitor on/off. 6. Power Indicator • The color definition of the power indicator is as the below table. Status Blue Amber OFF Description ON Standby mode OFF 1.4.1.2 VW197N/VW197D 123 456 1. • • • Button: Automatically adjust the image to its optimized position, clock, and phase by long pressing this button for 2-4 seconds (for VGA mode only). Use this hot key to switch from six video preset modes (Scenery Mode, Standard Mode, Theater Mode, Game Mode, Night View Mode, and sRGB Mode) with SPLENDID™ Video Intelligence Technology. Exit the OSD menu or go back to the previous menu as the OSD menu is active. 2. • • Button: Press this button to decrease the value of the function selected or move to the next function. This is also a hot key for Contrast adjustment. 3. MENU Button: • Press this button to enter the OSD menu. • Press this button to enter/select the icon (function) highlighted while the OSD is activated. 1-4 Chapter 1: Product Introduction
-
 1
1 -
2
-
3
-
4
-
 5
5 -
 6
6 -
 7
7 -
 8
8 -
 9
9 -
 10
10 -
 11
11 -
 12
12 -
 13
13 -
 14
14 -
 15
15 -
16
-
17
-
18
-
19
-
20
 |
 |
