Asus VINTAGE-AH1 Vintage-AH1 User''s Manual for English Edition - Page 40
Replacing the side plates and front, cover
 |
View all Asus VINTAGE-AH1 manuals
Add to My Manuals
Save this manual to your list of manuals |
Page 40 highlights
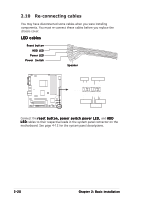
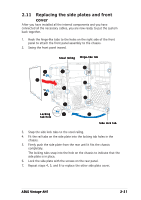
2.11 Replacing the side plates and front cover After you have installed all the internal components and you have connected all the necessary cables, you are now ready to put the system back together. 1. Hook the hinge-like tabs to the holes on the right side of the front panel to attach the front panel assembly to the chassis. 2. Swing the front panel inward. Steel railing Hinge-like tab 1 16 13 5 1 13 16 1 13 Locking 14 tab hole 2 Side lock tab 3. Snap the side lock tabs to the steel railing. 4. Fit the rail tabs on the side plate into the locking tab holes in the chassis. 5. Firmly push the side plate from the rear until it fits the chassis completely. The locking tabs snap into the hole on the chassis to indicate that the side plate is in place. 6. Lock the side plate with the screws on the rear panel. 7. Repeat steps 4, 5, and 6 to replace the other side plate cover. ASUS Vintage-AH1 2-21
-
 1
1 -
2
-
3
-
4
-
5
-
6
-
7
-
8
-
9
-
10
-
11
-
12
-
13
-
14
-
15
-
16
-
17
-
18
-
19
-
20
-
21
-
22
-
23
-
24
-
25
-
26
-
27
-
28
-
29
-
30
-
31
-
32
-
33
-
34
-
 35
35 -
 36
36 -
 37
37 -
 38
38 -
 39
39 -
 40
40 -
 41
41 -
 42
42 -
 43
43 -
 44
44 -
 45
45 -
46
-
47
-
48
-
49
-
50
-
51
-
52
-
53
-
54
-
55
-
56
-
57
-
58
-
59
-
60
-
61
-
62
-
63
-
64
-
65
-
66
-
67
-
68
-
69
-
70
-
71
-
72
-
73
-
74
-
75
-
76
-
77
-
78
-
79
-
80
-
81
-
82
-
83
-
84
-
85
-
86
-
87
-
88
-
89
-
90
-
91
-
92
-
93
-
94
-
95
-
96
-
97
-
98
-
99
-
100
-
101
-
102
-
103
 |
 |
