Asus VivoMini UN45H Installation guide for VivoMini memory wireless card and s - Page 2
Installing or upgrading the M.2 SSD, Installing 2.5 HDD on selected models, Installing or upgrading
 |
View all Asus VivoMini UN45H manuals
Add to My Manuals
Save this manual to your list of manuals |
Page 2 highlights
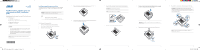
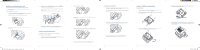
Installing or upgrading the wireless card Your VivoMini includes a mini-PCIe slot for half-size wireless and Bluetooth adapters. Refer to http://www.asus.com for the list of compatible wireless and Bluetooth adapters. To install or upgrade the wireless card: 1. Follow steps 1-5 on pages 2-3 under the Installing or upgrading memory modules section of this guide to remove the bottom cover of your VivoMini. 2. Align and insert the wireless card into the lower slot inside the VivoMini. 3. Gently push down the wireless card on top of the screw holes and fasten it using the 3mm round screw. 7 E10670_VivoMini_Memory_SSD_WiFi_installation_V3_fold.indd 7-12 4. Connect the black antenna to MAIN or and the white antenna to AUX or . Refer to the illustration for the right installation procedure. NOTE: A soft clicking sound indicates that the antenna has been securely attached on the wireless card. 5. Follow steps 7-10 on pages 4-6 under the Installing or upgrading memory modules section of this guide to replace the bottom cover back on your VivoMini. Installing or upgrading the M.2 SSD Your VivoMini includes a PCIe slot that supports a full-size or a half-size M.2 SSD. To install or upgrade a half-size M.2 SSD: 1. Follow steps 1-5 on pages 2-3 under the Installing or upgrading memory modules section of this guide to remove the bottom cover of your VivoMini. 8 2. Insert the hexagon screw, as illustrated. 3. Align and insert the half-size M.2 SSD into its slot inside the VivoMini. Refer to the illustration for its location. 4. Gently push down the half-size M.2 SSD on top of the screw hole and fasten it using one of the 3mm round screw. Refer to the illustration for the location of the screw hole. 5. Follow steps 7-10 on pages 4-6 under the Installing or upgrading memory modules section of this guide to replace the bottom cover back on your VivoMini. 9 To install or upgrade a full-size M.2 SSD: 1. Follow steps 1-5 on pages 2-3 under the Installing or upgrading memory modules section of this guide to remove the bottom cover of your VivoMini. 2. Align and insert the full-size M.2 SSD into its slot inside the VivoMini. Refer to the illustration for its location. 3. Gently push down the full-size M.2 SSD on top of the screw hole and fasten it using one of the 3mm round screw. Refer to the illustration for the location of the screw hole. 4. Follow steps 7-10 on pages 4-6 under the Installing or upgrading memory modules section of this guide to replace the bottom cover back on your VivoMini. 10 Installing 2.5" HDD (on selected models) To install the 2.5" HDD: 1. Follow steps 1-5 on pages 2-3 under the Installing or upgrading memory modules section of this guide to remove the bottom cover of your VivoMini. 2. Align the bundled bracket on each side of the HDD and insert four (4) screws to secure the 2.5" HDD to the bracket. 3. Connect the bundled HDD cable to the HDD, then secure the HDD and bracket to the bottom cover of your VivoMini using the four (4) bundled screws. 11 4. Remove the tape covering on the HDD cable and stick the cable to the bottom cover of your VivoMini as shown in the illustration below. 5. Connect the HDD cable to your VivoMini, then follow steps 7-10 on pages 4-6 under the Installing or upgrading memory modules section of this guide to replace the bottom cover back on your VivoMini. 12 2015/10/21 �� 04:55:11
-
 1
1 -
 2
2
 |
 |