Asus a7n8x Motherboard DIY Troubleshooting Guide - Page 17
Before you proceed, Central Processing Unit CPU - power supply
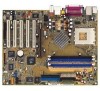 |
View all Asus a7n8x manuals
Add to My Manuals
Save this manual to your list of manuals |
Page 17 highlights
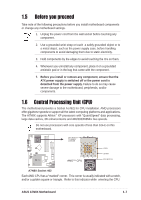
1.5 Before you proceed Take note of the following precautions before you install motherboard components or change any motherboard settings. 1. Unplug the power cord from the wall socket before touching any component. 2. Use a grounded wrist strap or touch a safely grounded object or to a metal object, such as the power supply case, before handling components to avoid damaging them due to static electricity. 3. Hold components by the edges to avoid touching the ICs on them. 4. Whenever you uninstall any component, place it on a grounded antistatic pad or in the bag that came with the component. 5. Before you install or remove any component, ensure that the ATX power supply is switched off or the power cord is detached from the power supply. Failure to do so may cause severe damage to the motherboard, peripherals, and/or components. 1.6 Central Processing Unit (CPU) The motherboard provides a Socket A (462) for CPU installation. AMD processors offer gigahertz speeds to support all the latest computing platforms and applications. The A7N8X supports Athlon™ XP processors with "QuantiSpeed" data processing, large data caches, 3D enhancements and 400/333/266Mhz bus speeds. Do not use processors with core speeds of less than 1GHz on this motherboard. ® A7N8X CPU NOTCH TO INNER CORNER AMD™ CPU LOCK LEVER CPU NOTCH A7N8X Socket 462 Each AMD CPU has a "marked" corner. This corner is usually indicated with a notch, and/or a golden square or triangle. Refer to this indicator while orienting the CPU. ASUS A7N8X Motherboard 1-7
-
 1
1 -
2
-
3
-
4
-
5
-
6
-
7
-
8
-
9
-
10
-
11
-
 12
12 -
 13
13 -
 14
14 -
 15
15 -
 16
16 -
 17
17 -
 18
18 -
 19
19 -
 20
20 -
 21
21 -
 22
22 -
23
-
24
-
25
-
26
-
27
-
28
-
29
-
30
-
31
-
32
-
33
-
34
-
35
-
36
-
37
-
38
-
39
-
40
-
41
-
42
-
43
-
44
-
45
-
46
-
47
-
48
-
49
-
50
-
51
-
52
-
53
-
54
-
55
-
56
-
57
-
58
-
59
-
60
 |
 |
